Chapter 7 Connections
They don’t get to choose.
— Daenerys Targaryen
Chapter 6 presented the major cluster computing trends, cluster managers, distributions, and cloud service providers to help you choose the Spark cluster that best suits your needs. In contrast, this chapter presents the internal components of a Spark cluster and how to connect to a particular Spark cluster.
When reading this chapter, don’t try to execute every line of code; this would be quite hard since you would need to prepare different Spark environments. Instead, if you already have a Spark cluster or if the previous chapter gets you motivated enough to sign up for an on-demand cluster, now is the time to learn how to connect to it. This chapter helps you connect to your cluster, which you should have already chosen by now. Without a cluster, we recommend that you learn the concepts and come back to execute code later on.
In addition, this chapter provides various troubleshooting connection techniques. While we hope you won’t need to use them, this chapter prepares you to use them as effective techniques to resolve connectivity issues.
While this chapter might feel a bit dry—connecting and troubleshooting connections is definitely not the most exciting part of large-scale computing—it introduces the components of a Spark cluster and how they interact, often known as the architecture of Apache Spark. This chapter, along with Chapters 8 and 9, will provide a detailed view of how Spark works, which will help you move toward becoming an intermediate Spark user who can truly understand the exciting world of distributed computing using Apache Spark.
7.1 Overview
The overall connection architecture for a Spark cluster is composed of three types of compute instances: the driver node, the worker nodes, and the cluster manager. A cluster manager is a service that allows Spark to be executed in the cluster; this was detailed in Clusters - Managers. The worker nodes (also referred to as executors) execute compute tasks over partitioned data and communicate intermediate results to other workers or back to the driver node. The driver node is tasked with delegating work to the worker nodes, but also with aggregating their results and controlling computation flow. For the most part, aggregation happens in the worker nodes; however, even after the nodes aggregate data, it is often the case that the driver node would need to collect the worker’s results. Therefore, the driver node usually has at least, but often much more, compute resources (memory, CPUs, local storage, etc.) as the worker node.
Strictly speaking, the driver node and worker nodes are just names assigned to machines with particular roles, while the actual computation in the driver node is performed by the Spark context. The Spark context is the main entry point for Spark functionality since it’s tasked with scheduling tasks, managing storage, tracking execution status, specifying access configuration settings, canceling jobs, and so on. In the worker nodes, the actual computation is performed under a spark executor, which is a Spark component tasked with executing subtasks against a specific data partition.
Figure 7.1 illustrates this concept, where the driver node orchestrates a worker’s work through the cluster manager.
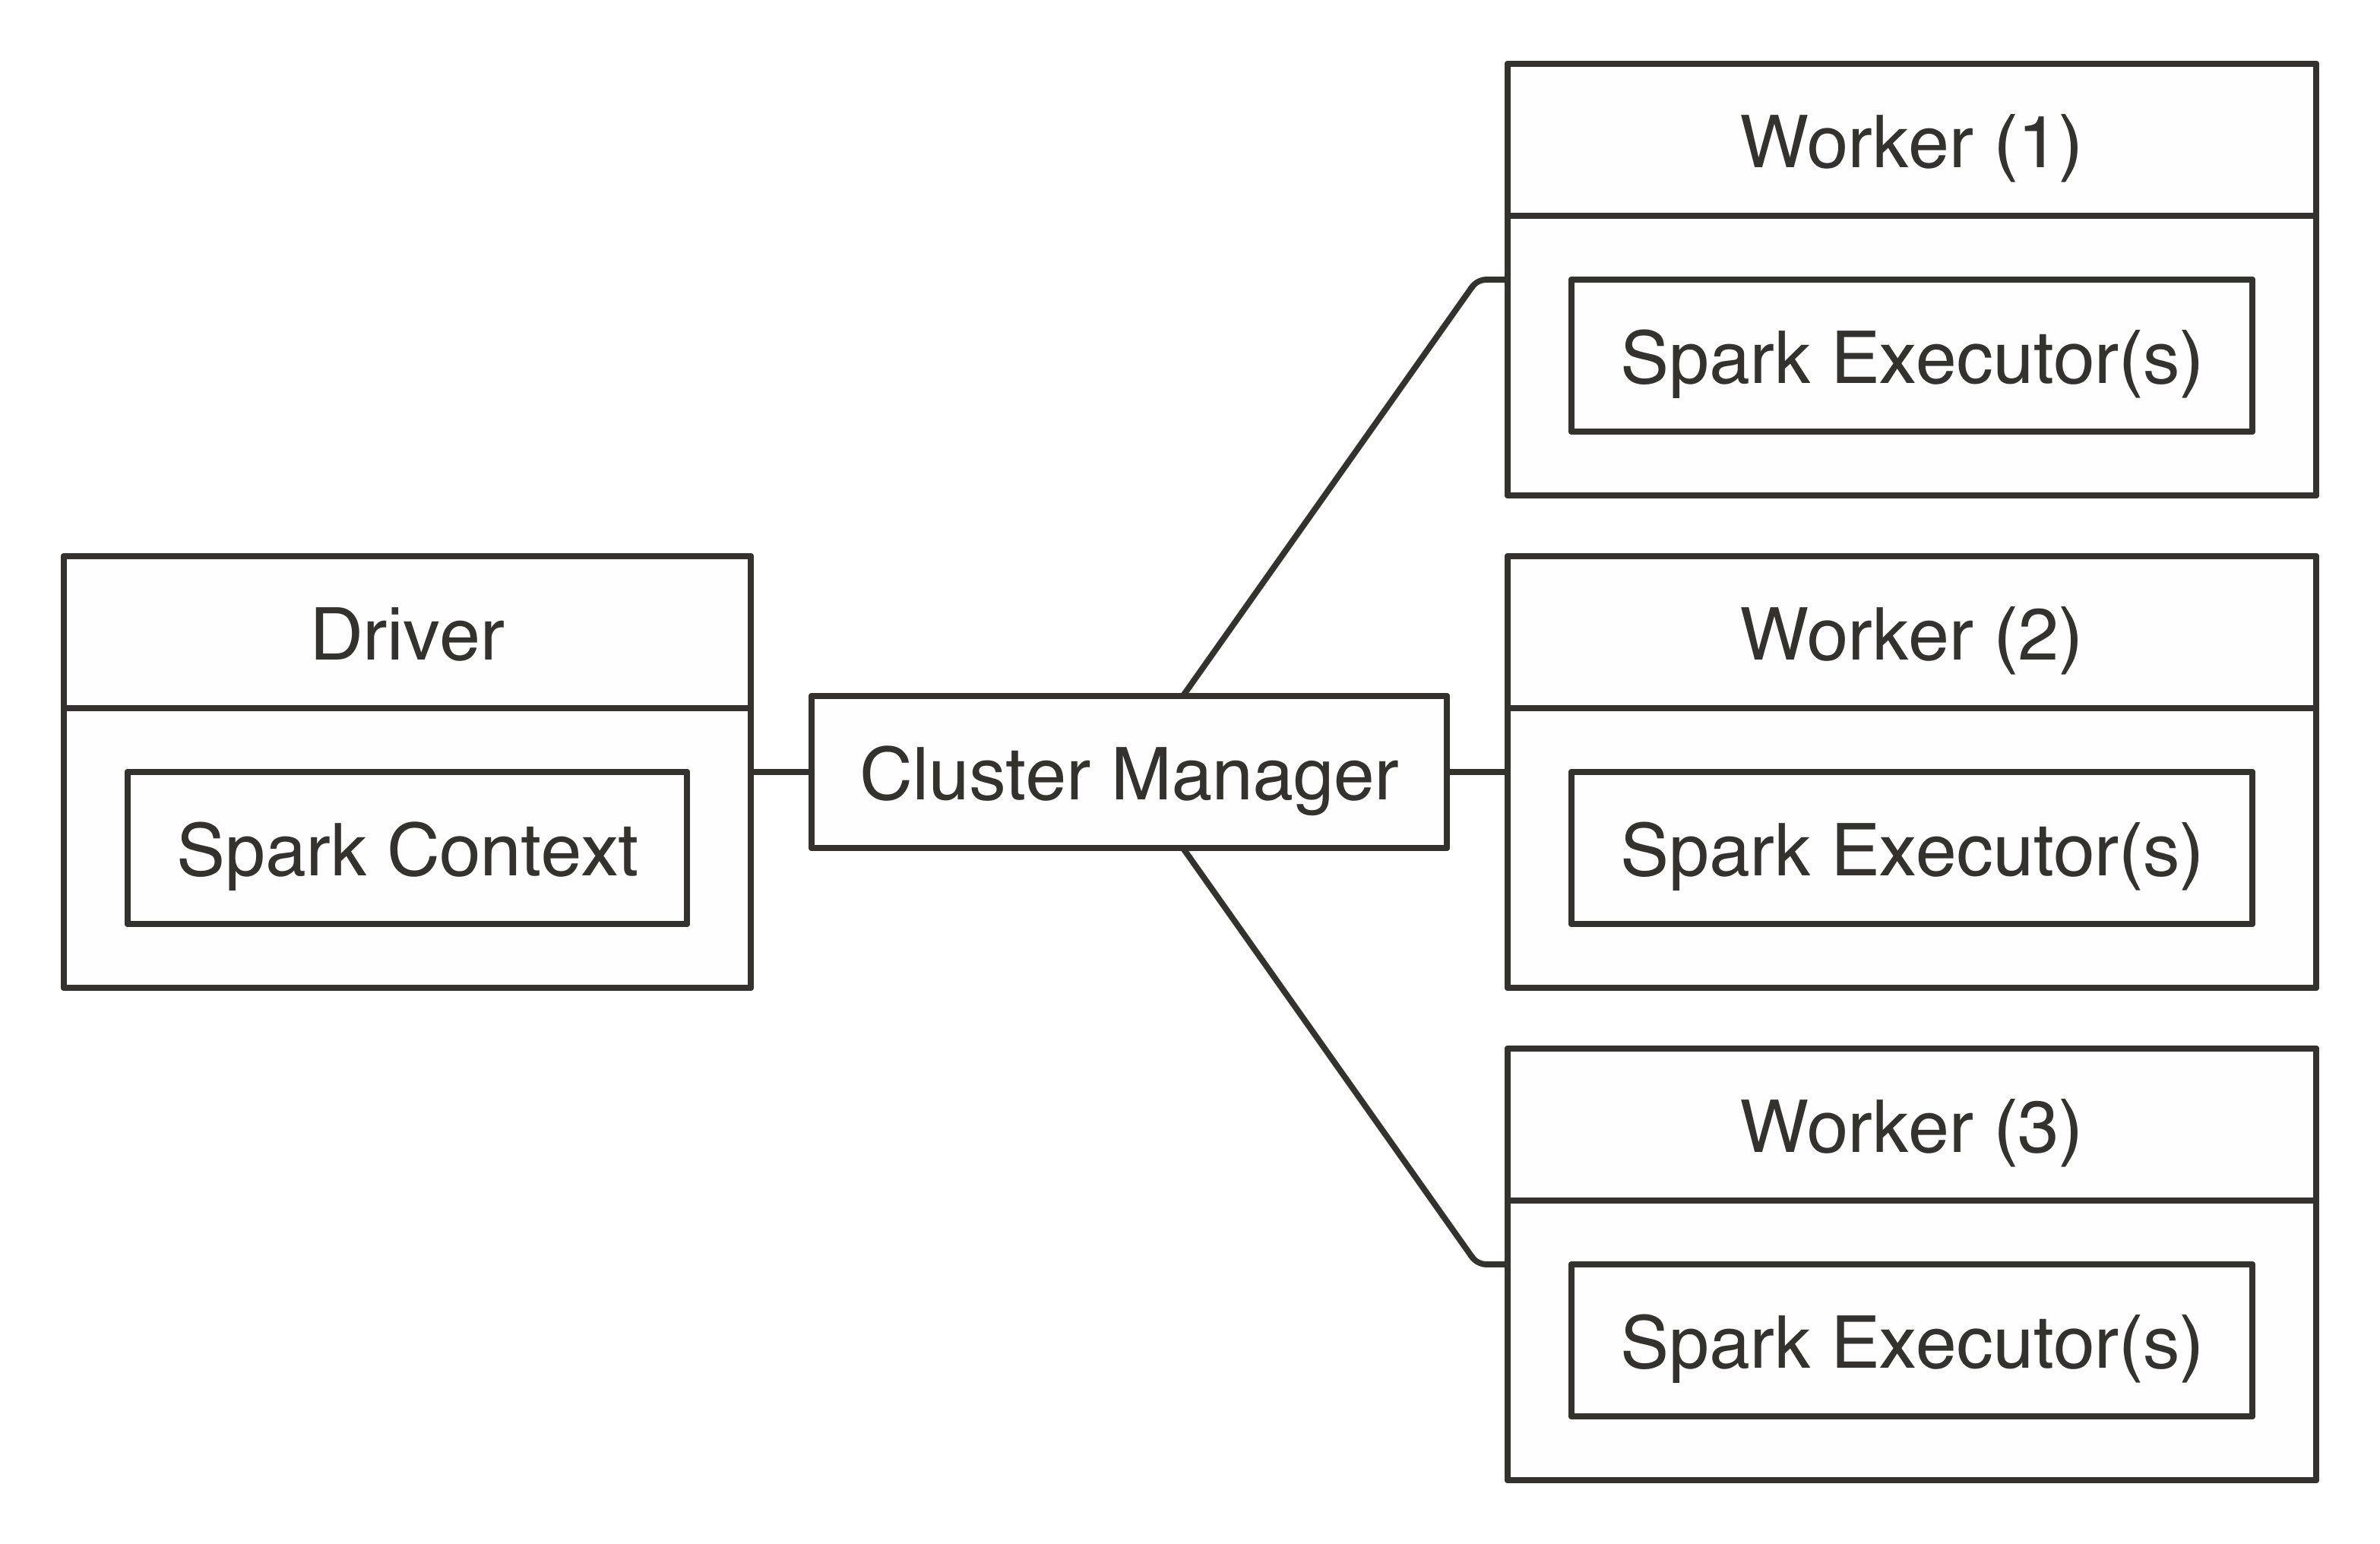
FIGURE 7.1: Apache Spark connection architecture
If you already have a Spark cluster in your organization, you should request the connection information to this cluster from your cluster administrator, read their usage policies carefully, and follow their advice. Since a cluster can be shared among many users, you want to ensure that you request only the compute resources you need. We cover how to request resources in Chapter 9. Your system administrator will specify whether it’s an on-premises or cloud cluster, the cluster manager being used, supported connections, and supported tools. You can use this information to jump directly to Standalone, YARN, Mesos, Livy, or Kubernetes based on which is appropriate for your situation.
Note: After you’ve used spark_connect() to connect, you can use all the techniques described in previous chapters using the sc connection; for instance, you can do data analysis or modeling with the same code previous chapters presented.
7.1.1 Edge Nodes
Computing clusters are configured to enable high bandwidth and fast network connectivity between nodes. To optimize network connectivity, the nodes in the cluster are configured to trust one another and to disable security features. This improves performance but requires you to close all external network communication, making the entire cluster secure as a whole except for a few cluster machines that are carefully configured to accept connections from outside the cluster; conceptually, these machines are located in the “edge” of the cluster and are known as edge nodes.
Therefore, before connecting to Apache Spark, it is likely that you will first need to connect to an edge node in your cluster. There are two methods to connect:
- Terminal
- Using a computer terminal application, you can use a Secure Shell to establish a remote connection into the cluster; after you connect into the cluster, you can launch R and then use
sparklyr. However, a terminal can be cumbersome for some tasks, like exploratory data analysis, so it’s often used only while configuring the cluster or troubleshooting issues. - Web Browser
- While using
sparklyrfrom a terminal is possible, it is usually more productive to install a web server in an edge node that provides access to run R withsparklyrfrom a web browser. Most likely, you will want to consider using RStudio or Jupyter rather than connecting from the terminal.
Figure 7.2 explains these concepts visually. The left block is usually your web browser, and the right block is the edge node. Client and edge nodes communicate over HTTP when using a web browser or Secure Shell (SSH) when using the terminal.
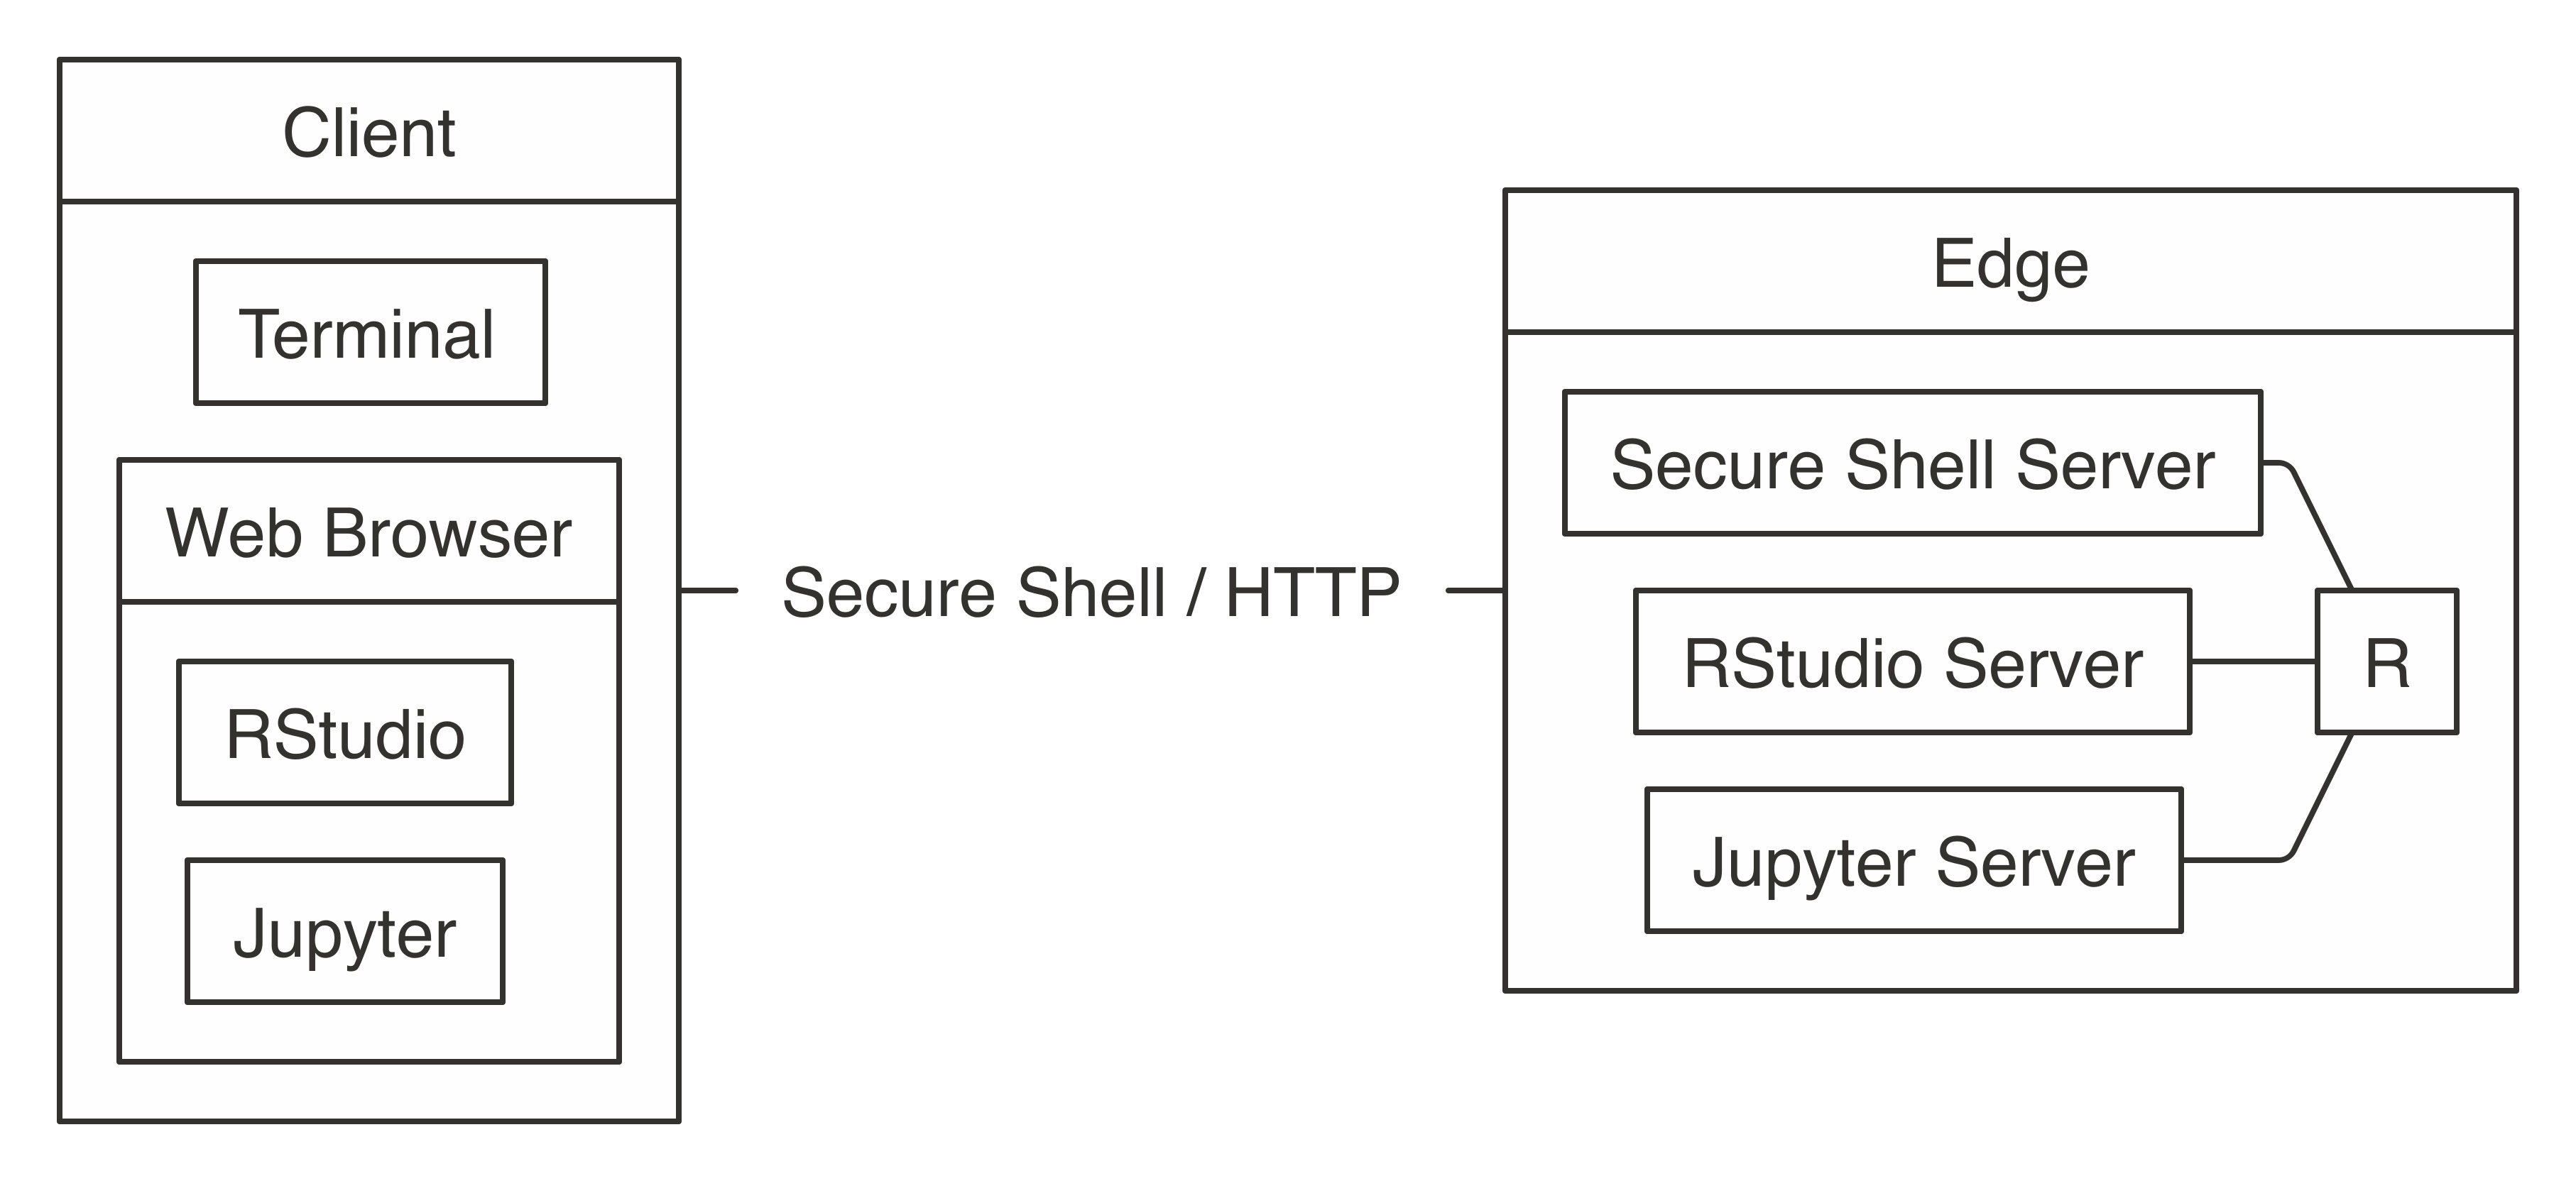
FIGURE 7.2: Connecting to Spark’s edge node
7.1.2 Spark Home
After you connect to an edge node, the next step is to determine where Spark is installed, a location known as the SPARK_HOME. In most cases, your cluster administrator will have already set the SPARK_HOME environment variable to the correct installation path. If not, you will need to get the correct SPARK_HOME path. You must specify the SPARK_HOME path as an environment variable or explicitly when running spark_connect() using the spark_home parameter.
If your cluster provider or cluster administrator already provided SPARK_HOME for you, the following code should return a path instead of an empty string:
If this code returns an empty string, this would mean that the SPARK_HOME environment variable is not set in your cluster, so you will need to specify SPARK_HOME while using spark_connect(), as follows:
In this example, master is set to the correct cluster manager master for Spark Standalone, YARN, Mesos, Kubernetes, or Livy.
7.2 Local
When you connect to Spark in local mode, Spark starts a single process that runs most of the cluster components like the Spark context and a single executor. This is ideal to learn Spark, work offline, troubleshoot issues, or test code before you run it over a large compute cluster. Figure 7.3 depicts a local connection to Spark.
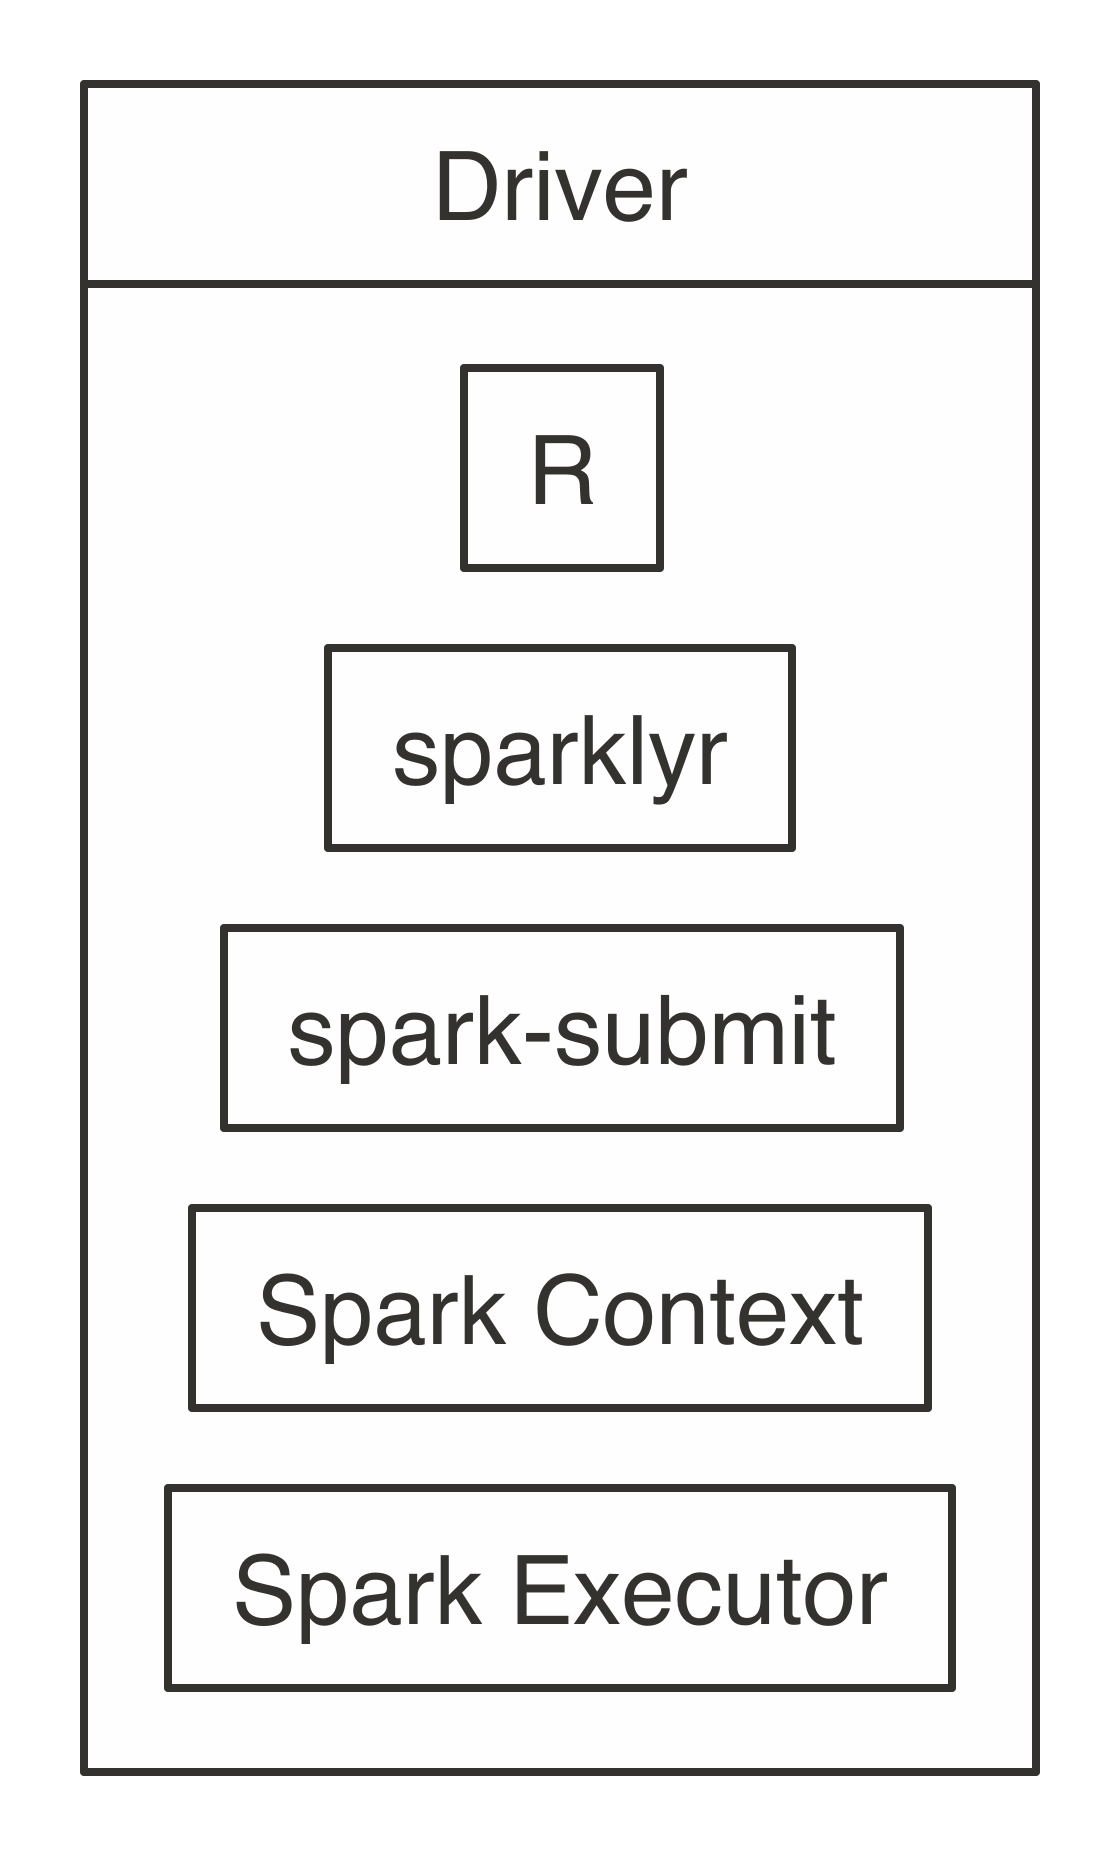
FIGURE 7.3: Local connection diagram
Notice that there is neither a cluster manager nor worker process since, in local mode, everything runs inside the driver application. It’s also worth noting that sparklyr starts the Spark context through spark-submit, a script available in every Spark installation to enable users to submit custom applications to Spark. If you’re curious, <sparklyr to submit this application and connect properly from R.
To perform this local connection, we can use the following familiar code from previous chapters:
7.3 Standalone
Connecting to a Spark Standalone cluster requires the location of the cluster manager’s master instance, which you can find in the cluster manager web interface as described in the Clusters - Standalone section. You can find this location by looking for a URL starting with spark://.
A connection in standalone mode starts from sparklyr, which launches spark-submit, which then submits the sparklyr application and creates the Spark Context, which requests executors from the Spark Standalone instance running under the given master address.
Figure 7.4 illustrates this process, which is quite similar to the overall connection architecture from Figure 7.1 but with additional details that are particular to standalone clusters and sparklyr.
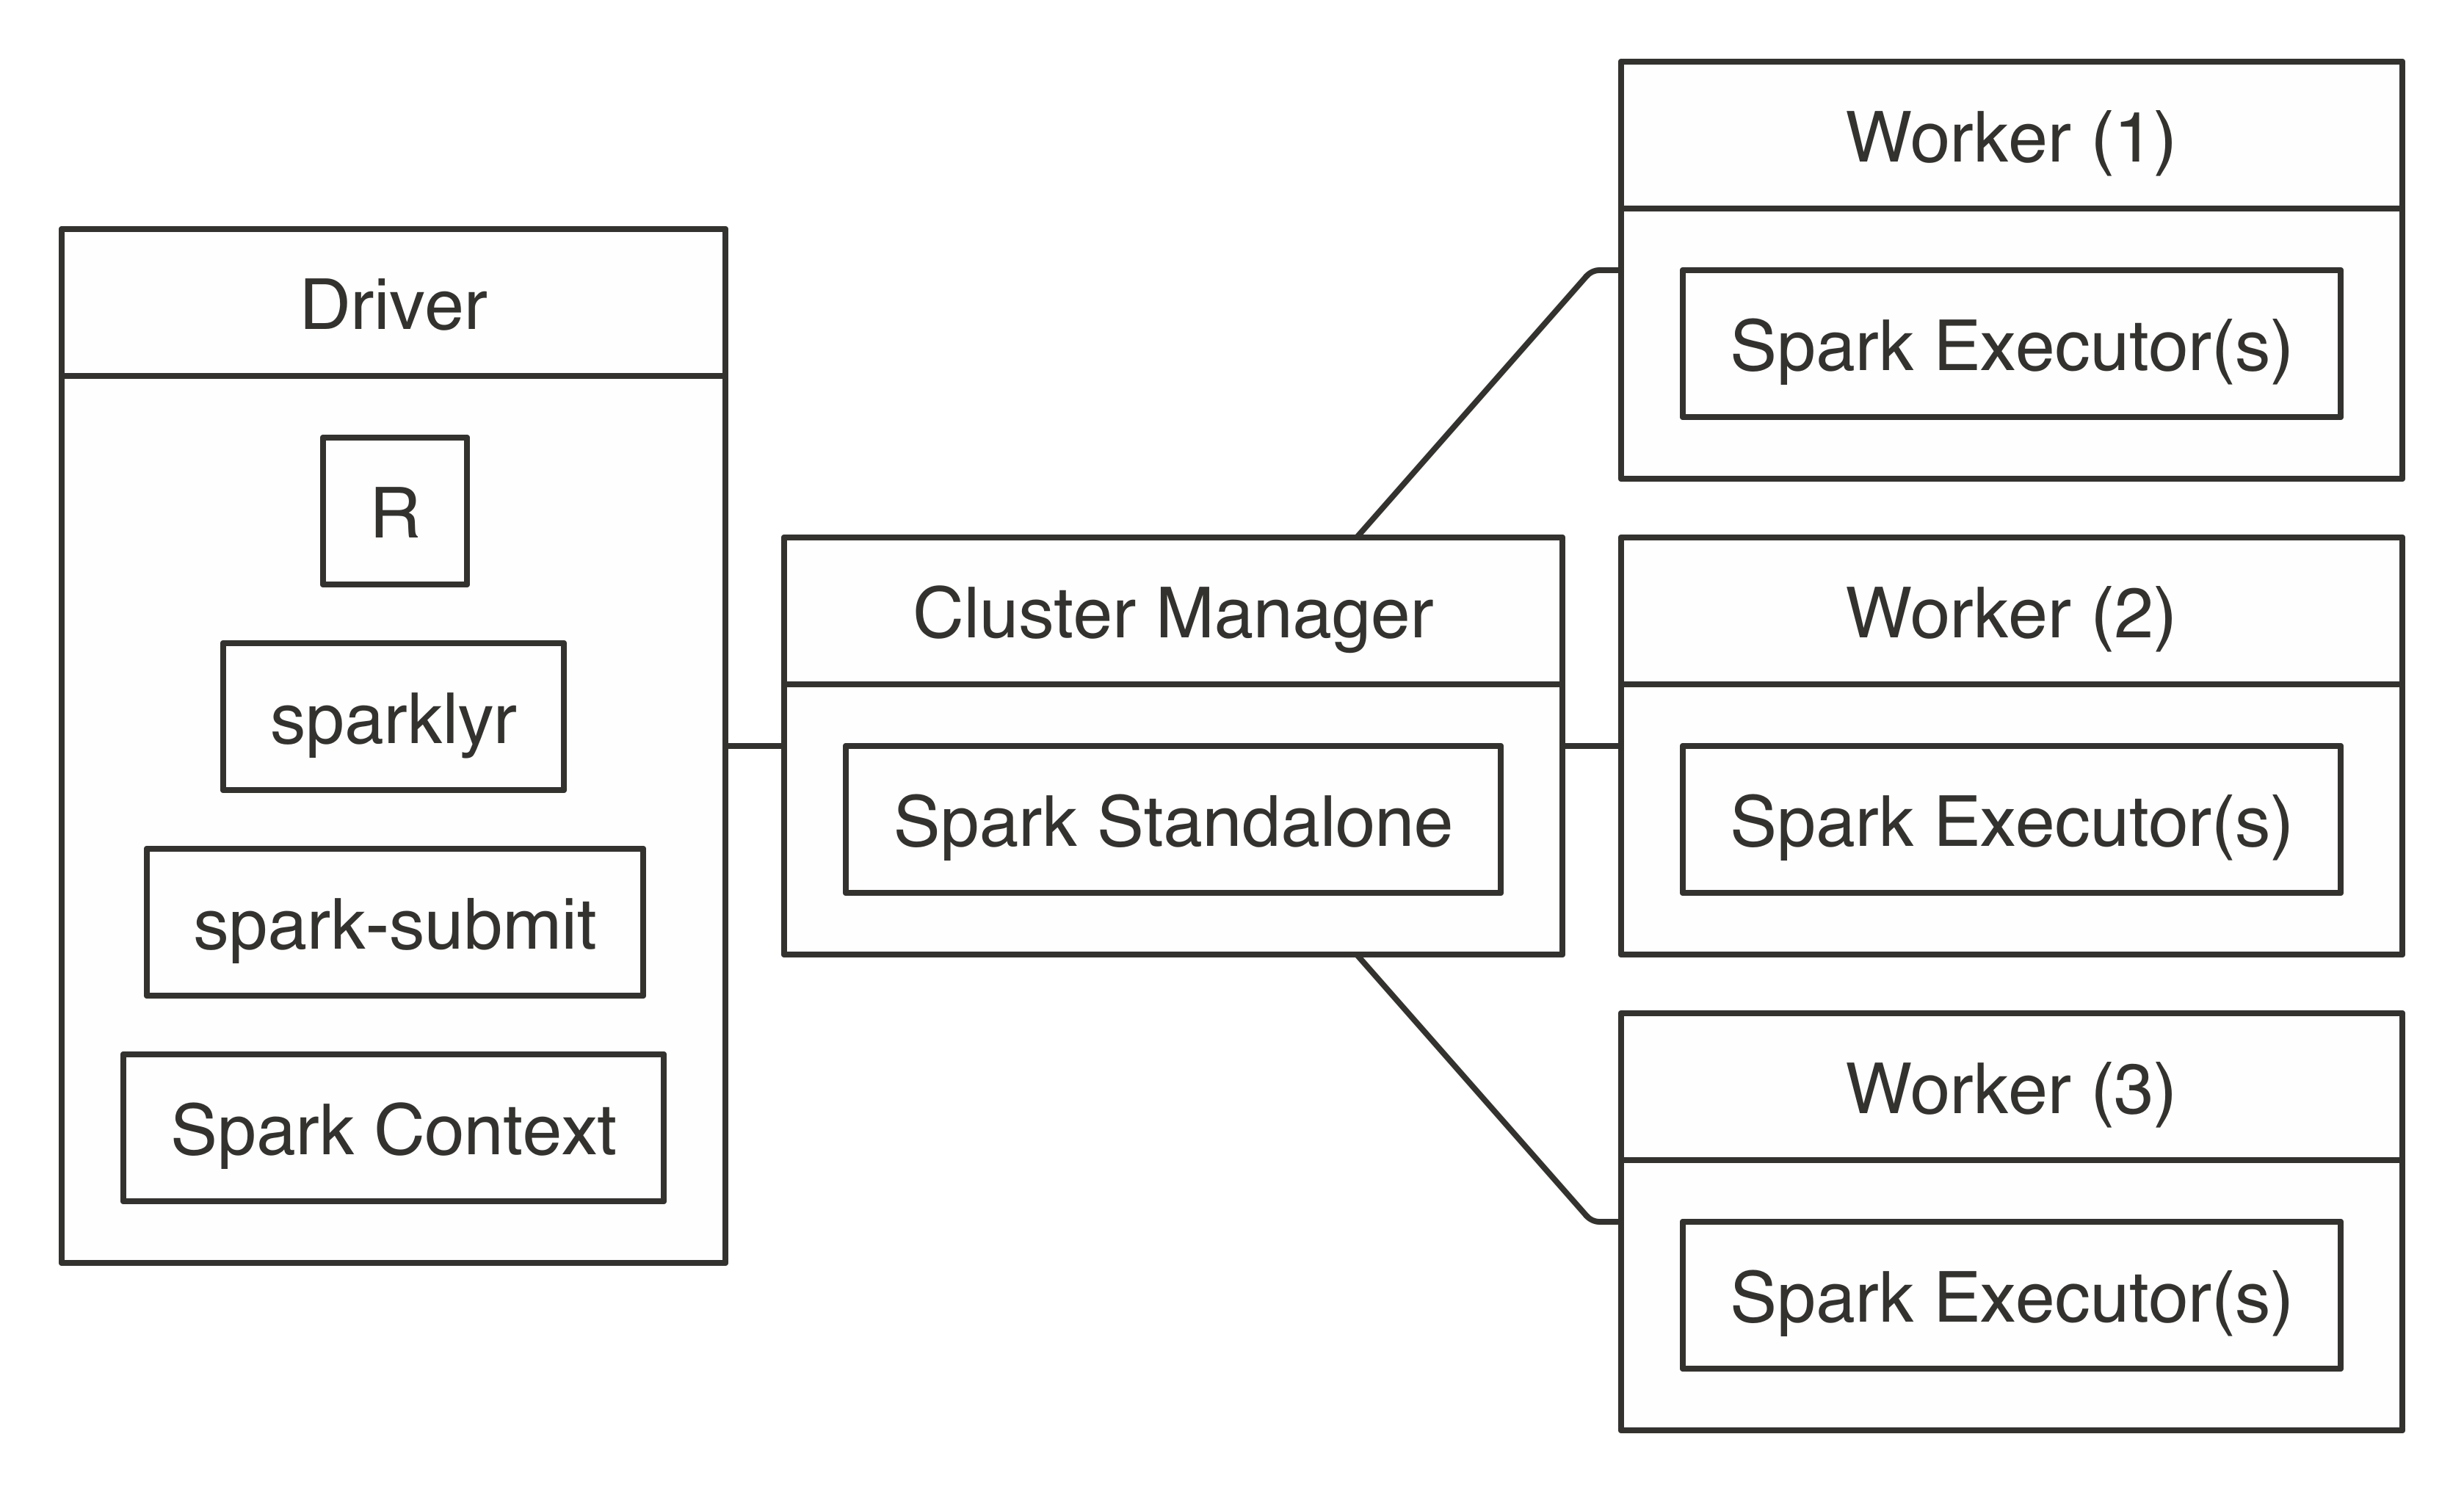
FIGURE 7.4: Spark Standalone connection diagram
To connect, use master = "spark://hostname:port" in spark_connect() as follows:
7.4 Yarn
Hadoop YARN is the cluster manager from the Hadoop project. It’s the most common cluster manager that you are likely to find in clusters, which started out as Hadoop clusters; with Cloudera, Hortonworks, and MapR distributions as when using Amazon EMR. YARN supports two connection modes: YARN client and YARN cluster. However, YARN client mode is much more common than YARN cluster since it’s more efficient and easier to set up.
7.4.1 Yarn Client
When you connect in YARN client mode, the driver instance runs R, sparklyr, and the Spark context, which requests worker nodes from YARN to run Spark executors, as shown in Figure 7.5.
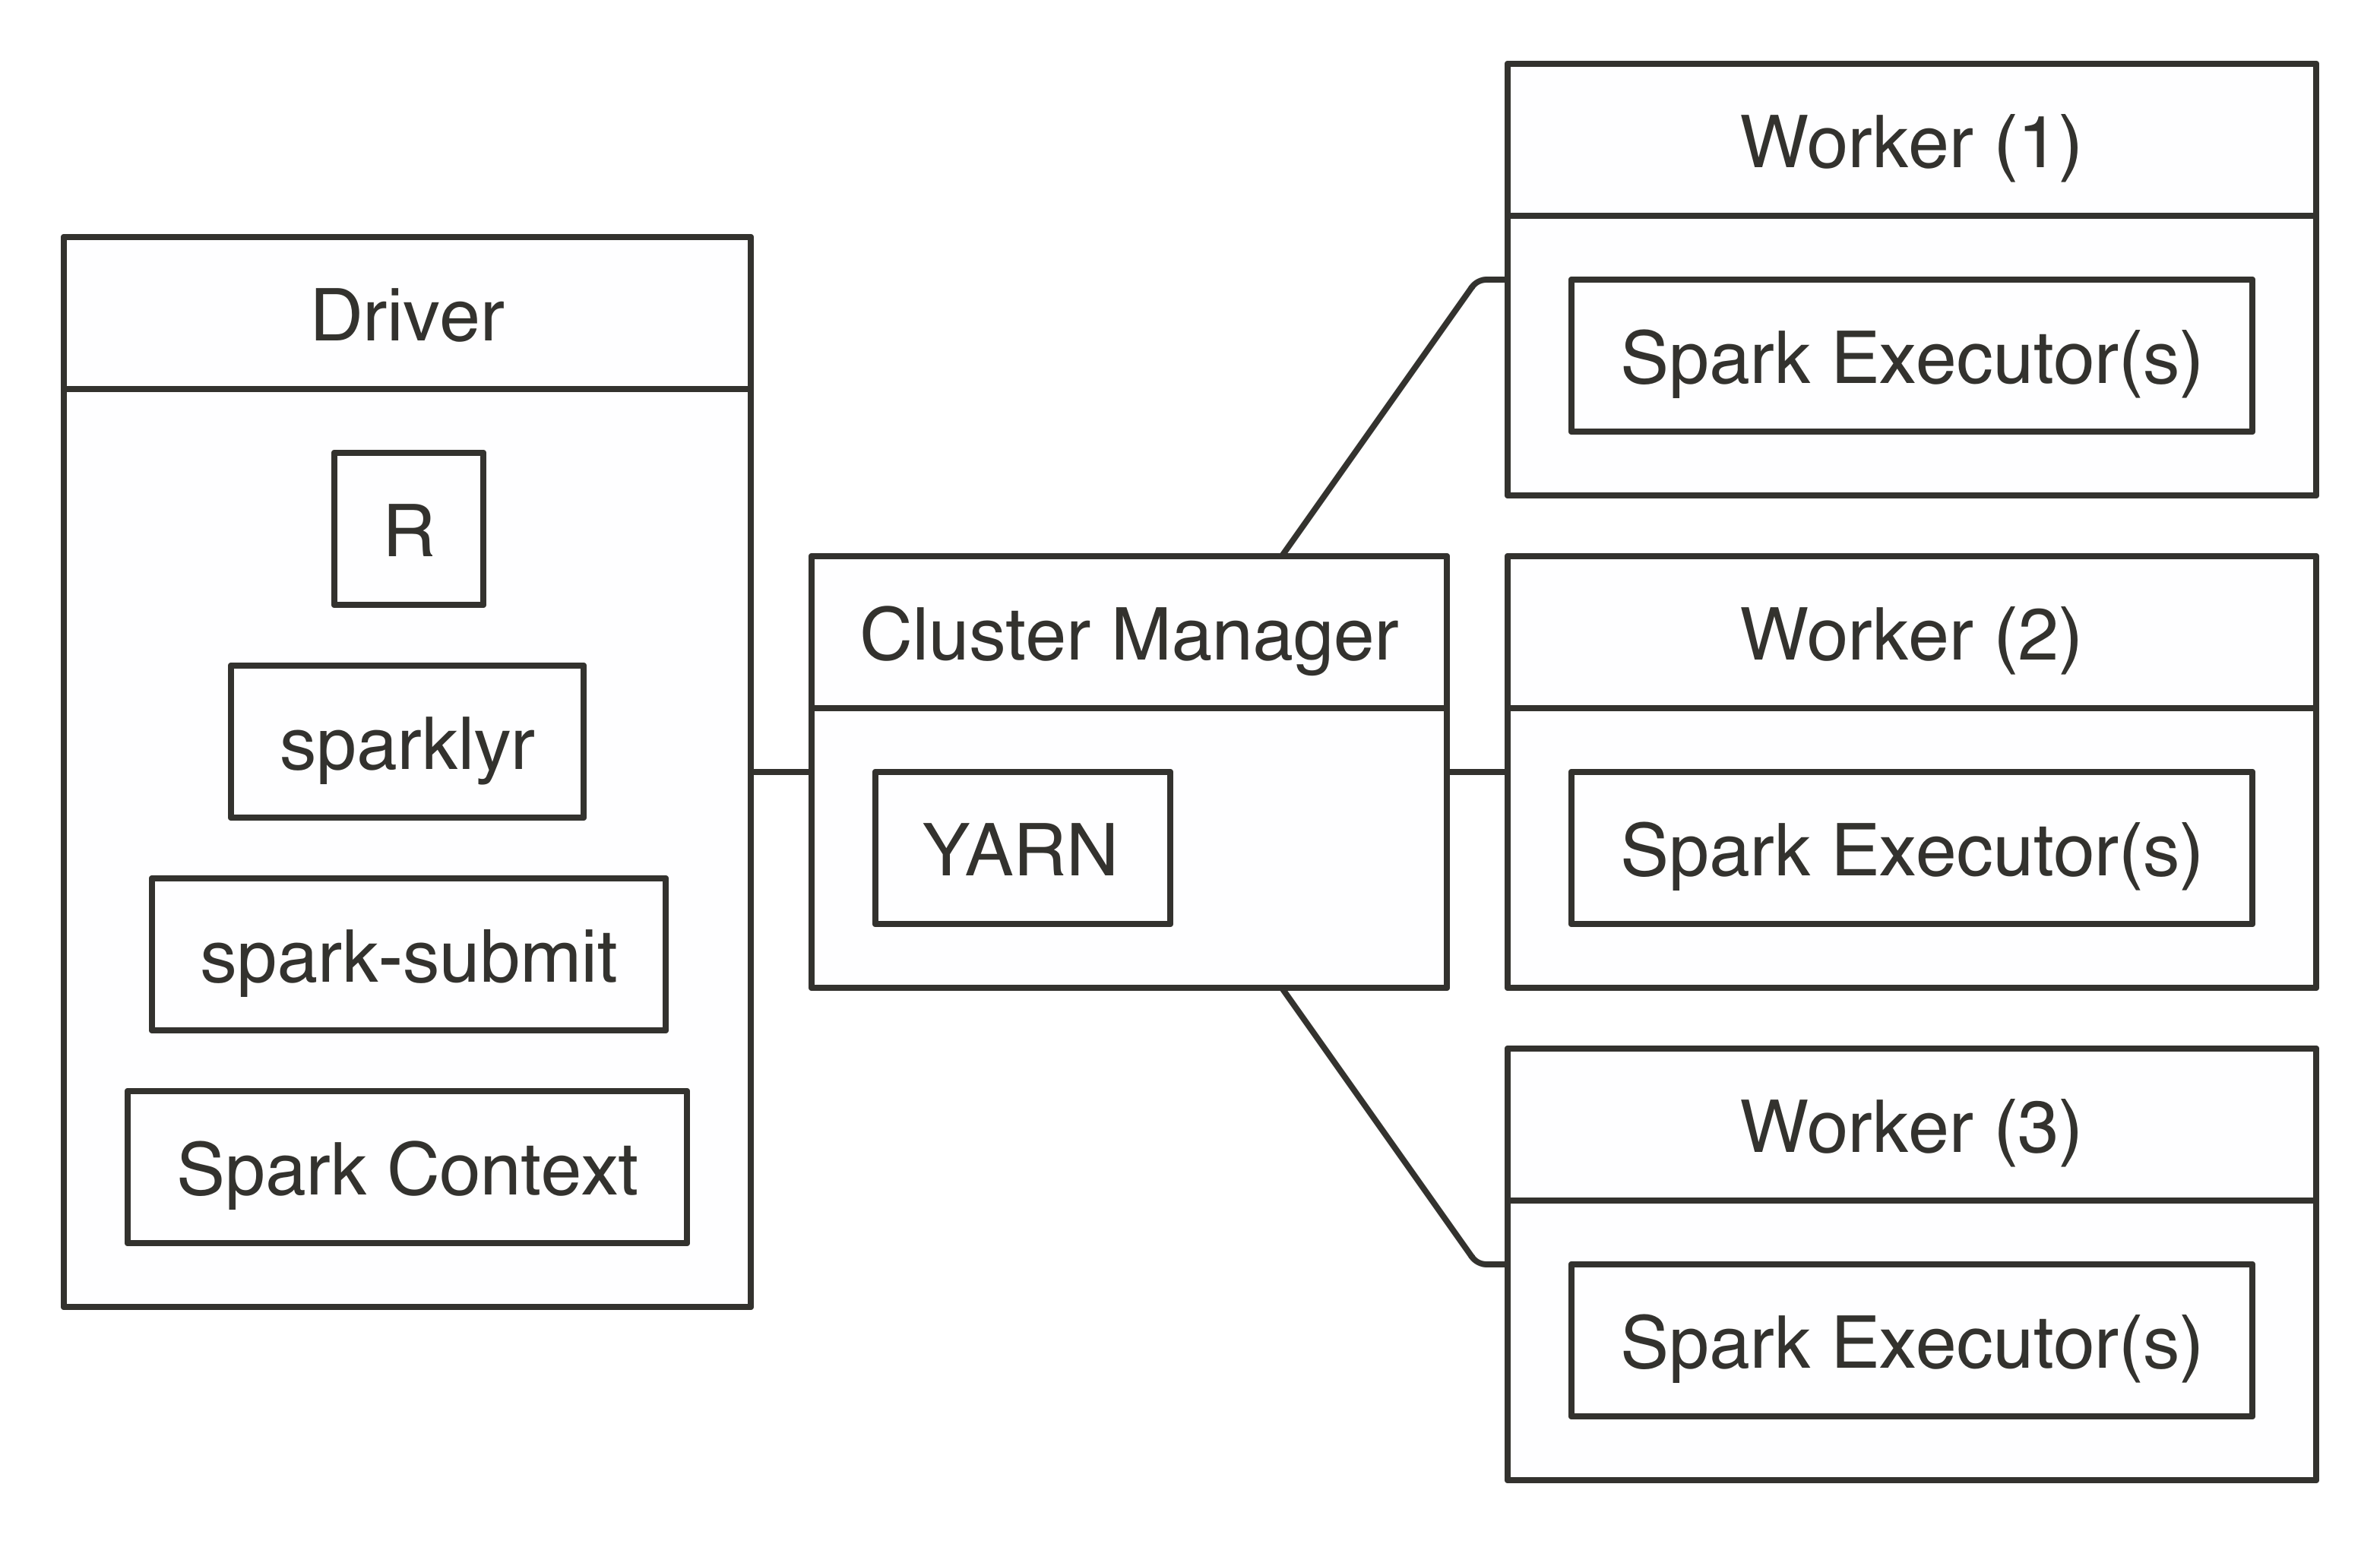
FIGURE 7.5: YARN client connection diagram
To connect, you simply run with master = "yarn", as follows:
Behind the scenes, when you’re running YARN in client mode, the cluster manager will do what you would expect a cluster manager would do: it allocates resources from the cluster and assigns them to your Spark application, which the Spark context will manage for you. The important piece to notice in Figure 7.5 is that the Spark context resides in the same machine where you run R code; this is different when you’re running YARN in cluster mode.
7.4.2 Yarn Cluster
The main difference between running YARN in cluster mode and running YARN in client mode is that, in cluster mode, the driver node is not required to be the node where R and sparklyr were launched; instead, the driver node remains the designated driver node, which is usually a different node than the edge node where R is running. It can be helpful to consider using cluster mode when the edge node has too many concurrent users, when it is lacking computing resources, or when tools (like RStudio or Jupyter) need to be managed independently of other cluster resources.
Figure 7.6 shows how the different components become decoupled when running in cluster mode. Notice there is still a line connecting the client with the cluster manager since, first of all, resources still need to be allocated from the cluster manager; however, after they’re allocated, the client communicates directly with the driver node, which communicates with the worker nodes. From Figure 7.6, you might think that cluster mode looks much more complicated than client mode—this would be a correct assessment; therefore, if possible, it’s best to avoid cluster mode due to its additional configuration overhead.
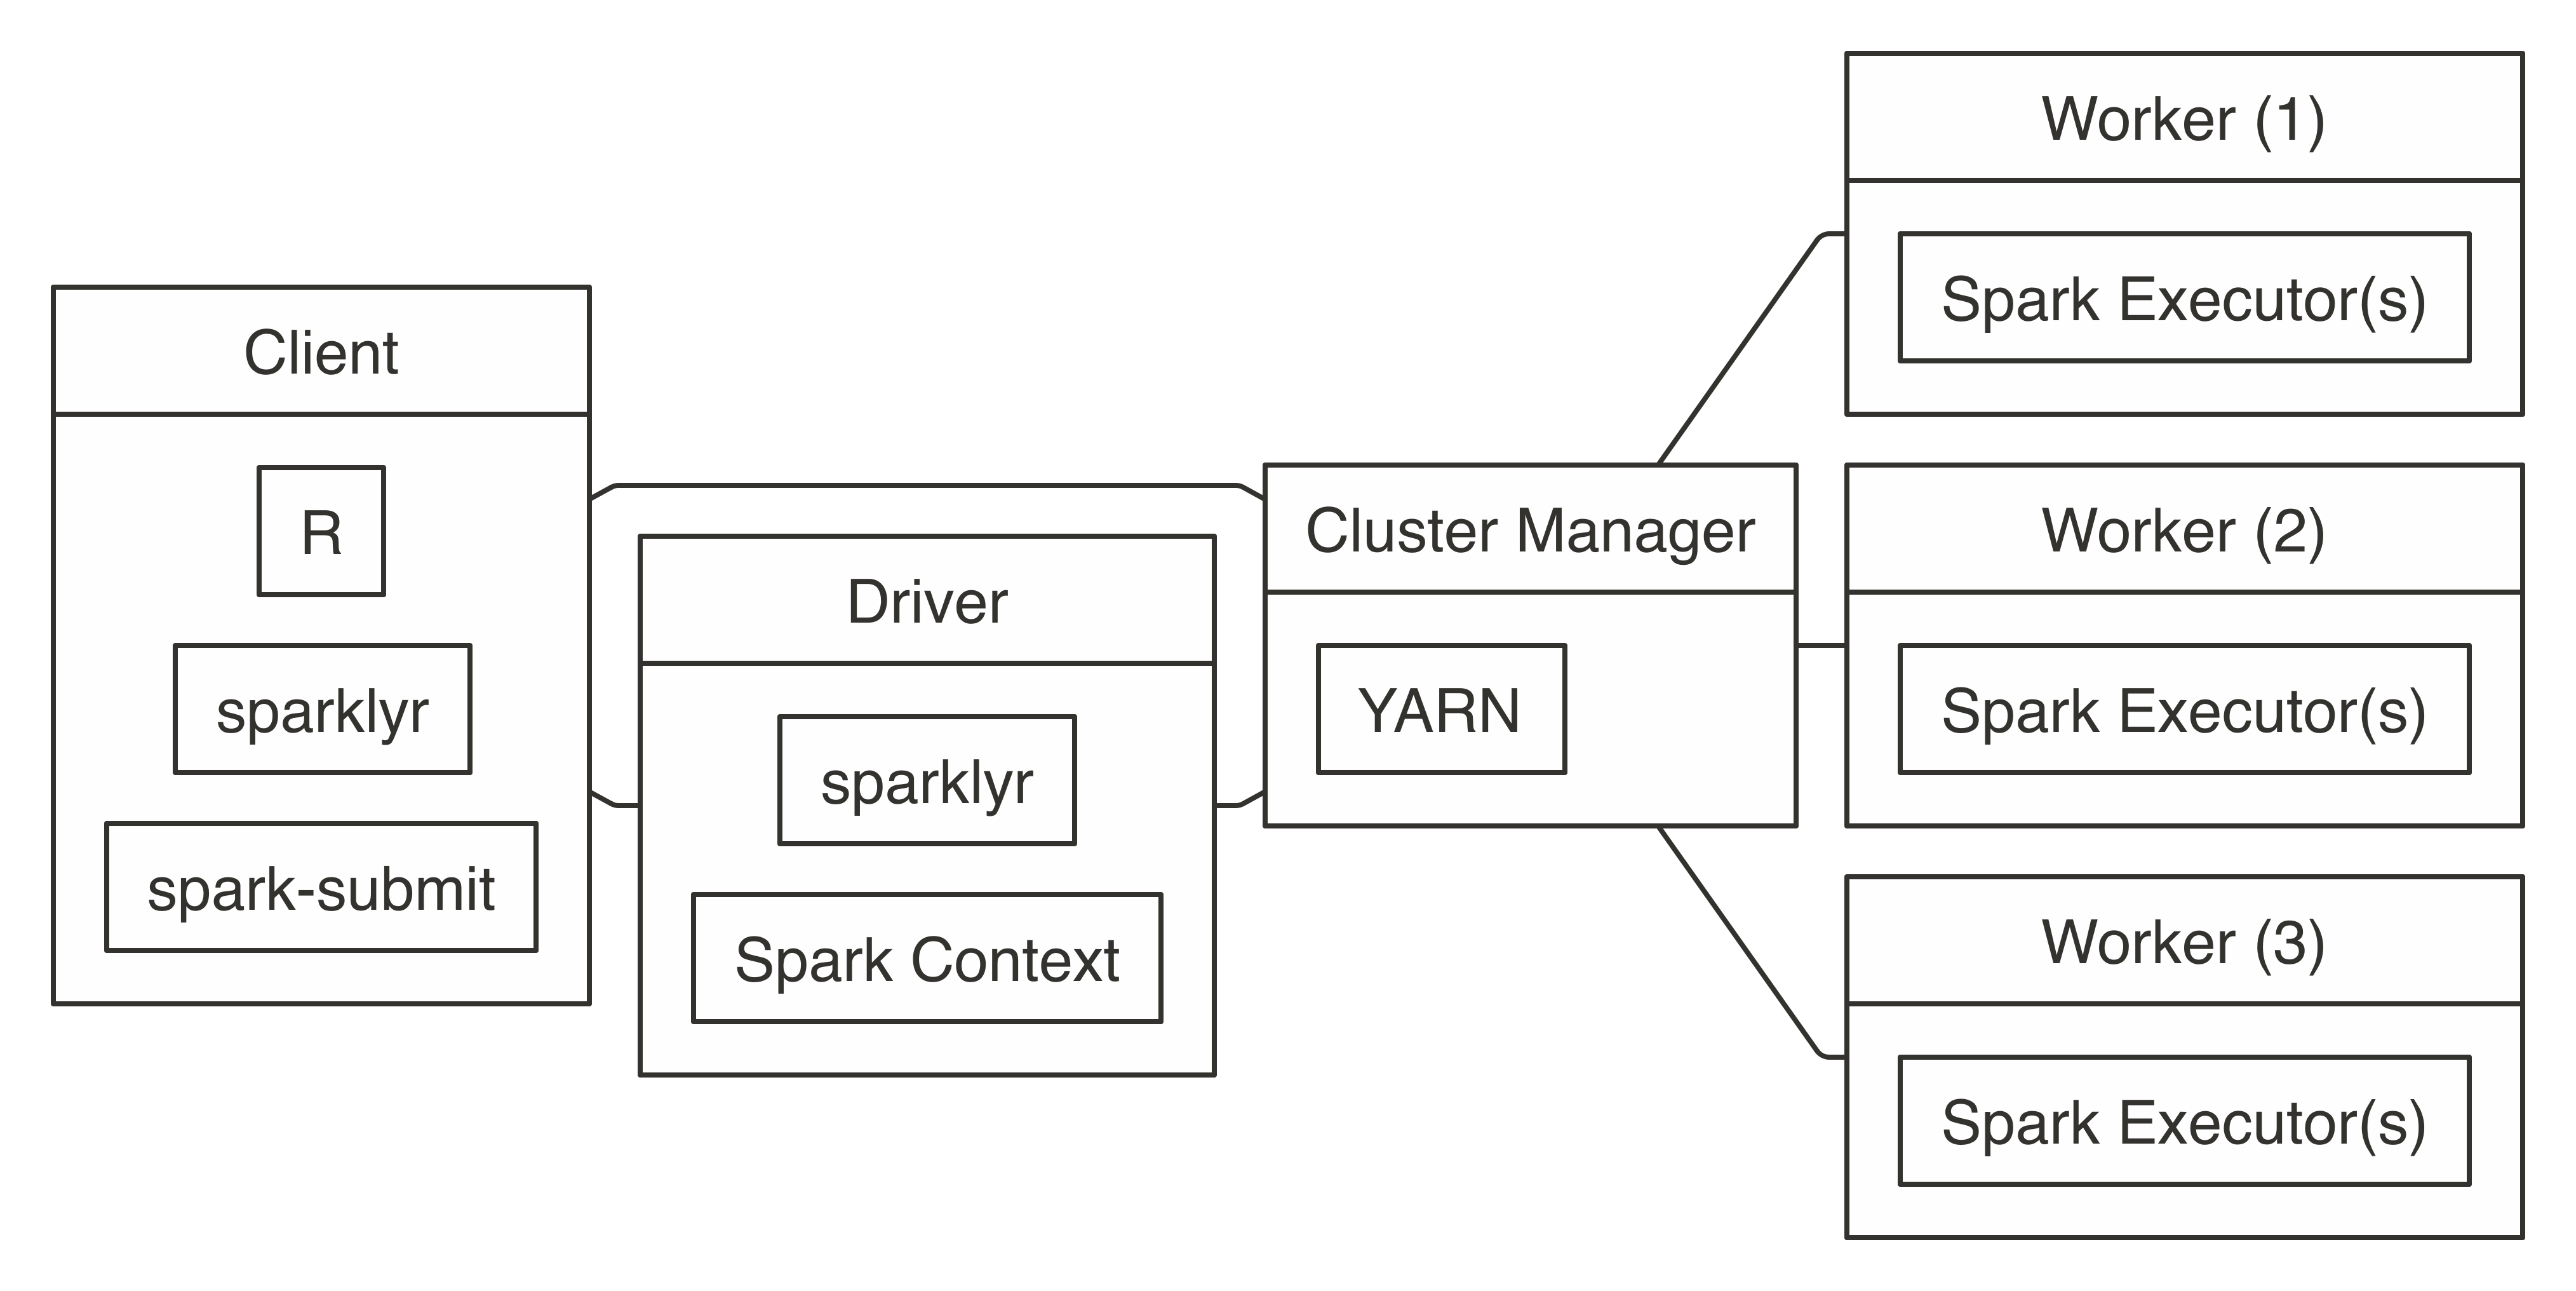
FIGURE 7.6: YARN cluster connection diagram
To connect in YARN cluster mode, simply run the following:
Cluster mode assumes that the node running spark_connect() is properly configured, meaning that yarn-site.xml exists and the YARN_CONF_DIR environment variable is properly set. When using Hadoop as a file system, you will also need the HADOOP_CONF_DIR environment variable properly configured. In addition, you would need to ensure proper network connectivity between the client and the driver node—not just by having both machines reachable, but also by making sure that they have sufficient bandwidth between them. This configuration is usually provided by your system administrator and is not something that you would need to manually configure.
7.5 Livy
As opposed to other connection methods that require using an edge node in the cluster, Livy provides a web API that makes the Spark cluster accessible from outside the cluster and does not require a Spark installation in the client. After it’s connected through the web API, the Livy Service starts the Spark context by requesting resources from the cluster manager and distributing work as usual. Figure 7.7 illustrates a Livy connection; notice that the client connects remotely to the driver through a web API.
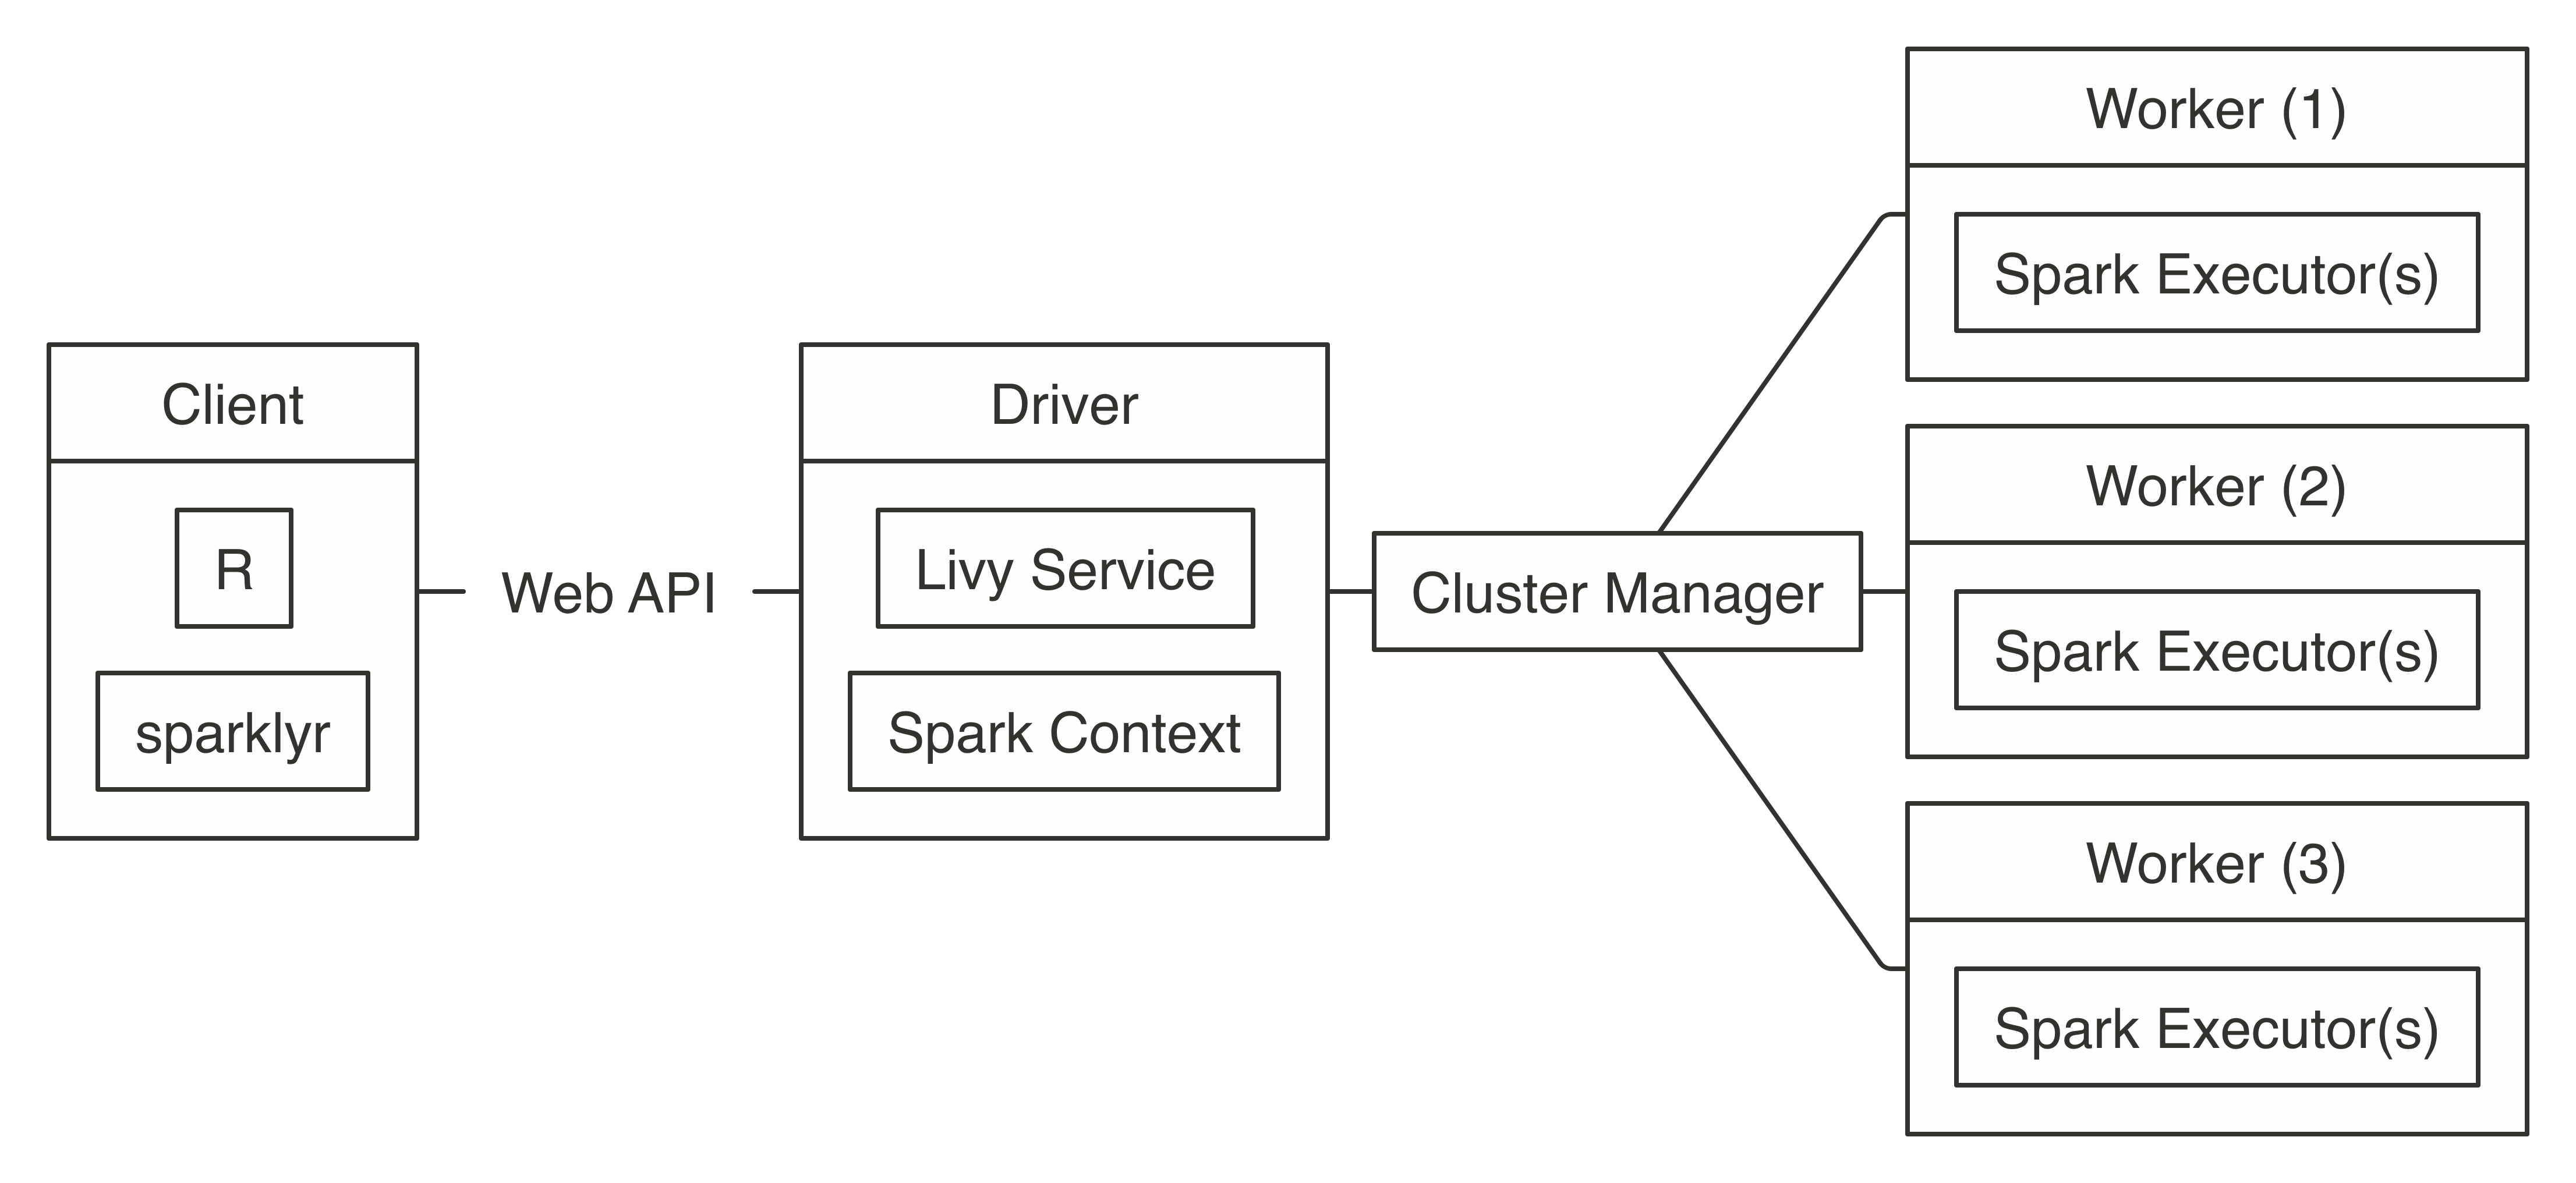
FIGURE 7.7: Livy connection diagram
Connecting through Livy requires the URL to the Livy service, which should be similar to https://hostname:port/livy. Since remote connections are allowed, connections usually require, at the very least, basic authentication:
sc <- spark_connect(
  master = "https://hostname:port/livy",
  method = "livy", config = livy_config(
    spark_version = "2.4.0",
    username = "<username>",
    password = "<password>"
  ))
To try out Livy on your local machine, you can install and run a Livy service as described under the Clusters - Livy section and then connect as follows:
After you’re connected through Livy, you can make use of any sparklyr feature; however, Livy is not suitable for exploratory data analysis, since executing commands has a significant performance cost. That said, while running long-running computations, this overhead could be considered irrelevant. In general, you should prefer to avoid using Livy and work directly within an edge node in the cluster; when this is not feasible, using Livy could be a reasonable approach.
Note: Specifying the Spark version through the spark_version parameter is optional; however, when the version is specified, performance is significantly improved by deploying precompiled Java binaries compatible with the given version. Therefore, it is a best practice to specify the Spark version when connecting to Spark using Livy.
7.6 Mesos
Similar to YARN, Mesos supports client mode and a cluster mode; however, sparklyr currently supports only client mode under Mesos. Therefore, the diagram shown in Figure 7.8 is equivalent to YARN client’s diagram with only the cluster manager changed from YARN to Mesos.
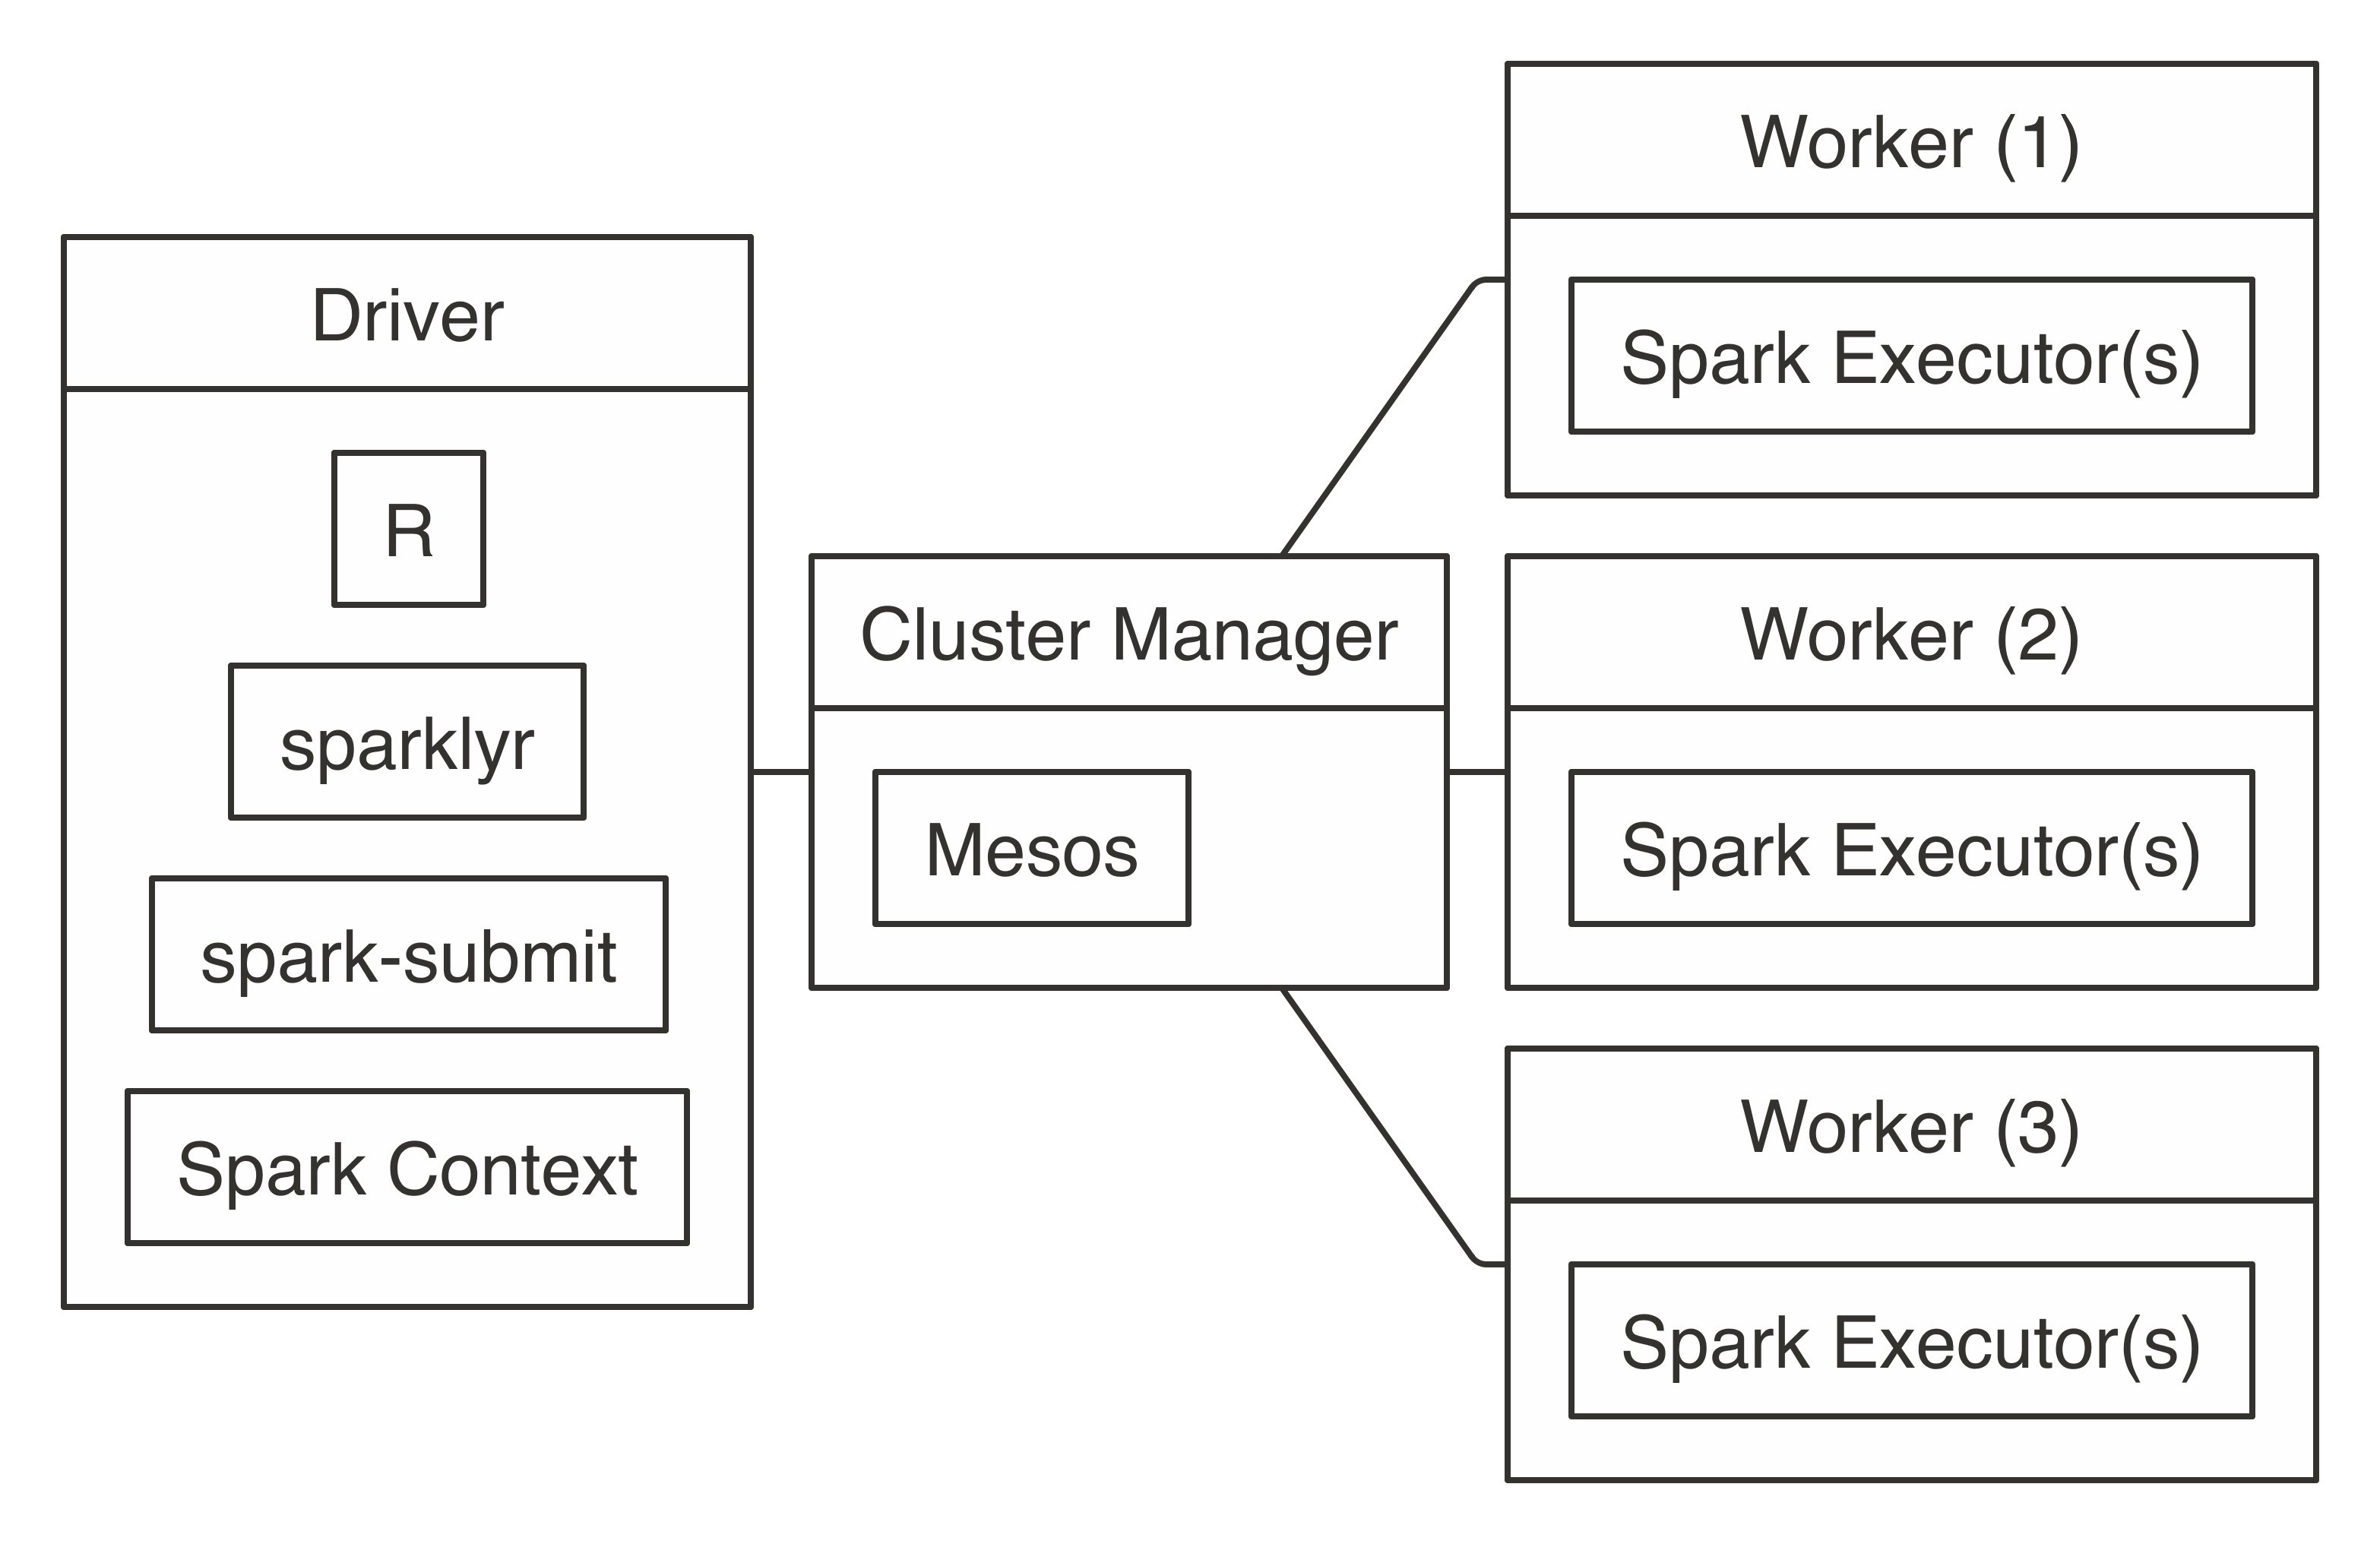
FIGURE 7.8: Mesos connection diagram
Connecting requires the address to the Mesos master node, usually in the form of mesos://host:port or mesos://zk://host1:2181,host2:2181,host3:2181/mesos for Mesos using ZooKeeper:
The MESOS_NATIVE_JAVA_LIBRARY environment variable needs to be set by your system administrator or manually set when you are running Mesos on your local machine. For instance, in macOS, you can install and initialize Mesos from a terminal, followed by manually setting the mesos library and connecting with spark_connect():
7.7 Kubernetes
Kubernetes clusters do not support client modes like Mesos or YARN; instead, the connection model is similar to YARN cluster, where the driver node is assigned by Kubernetes, as illustrated in Figure 7.9.
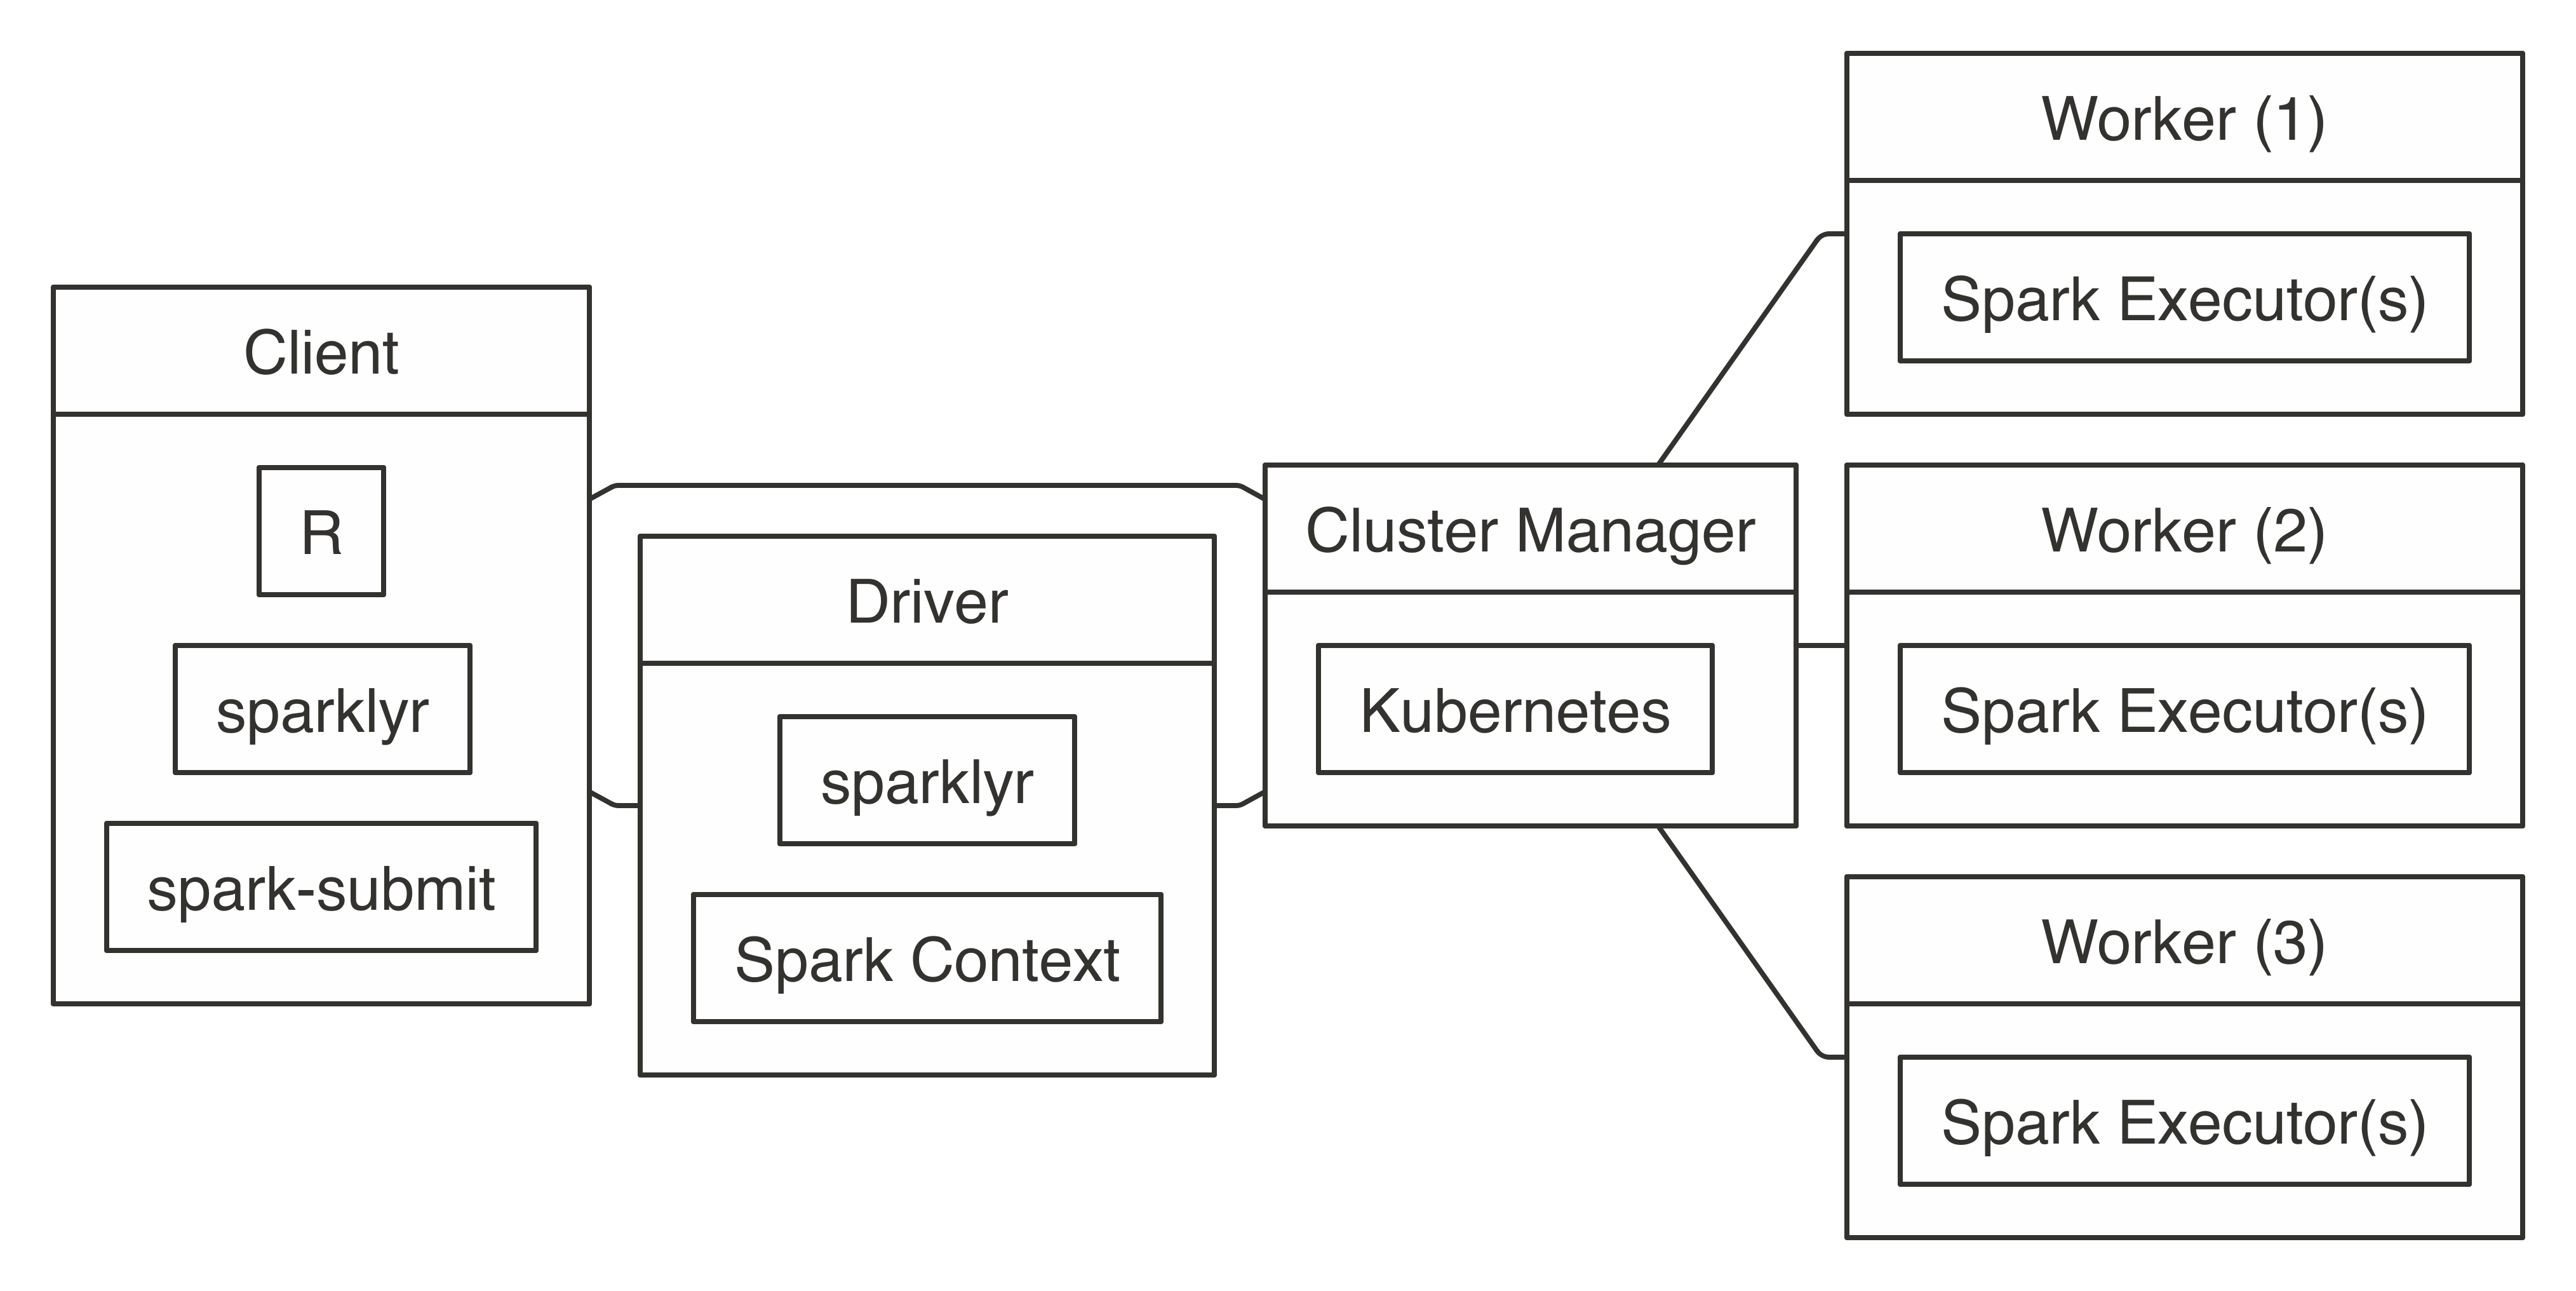
FIGURE 7.9: Kubernetes connection diagram
To use Kubernetes, you will need to prepare a virtual machine with Spark installed and properly configured; however, it is beyond the scope of this book to present how to create one. Once created, connecting to Kubernetes works as follows:
library(sparklyr)
sc <- spark_connect(config = spark_config_kubernetes(
  "k8s://https://<apiserver-host>:<apiserver-port>",
  account = "default",
  image = "docker.io/owner/repo:version",
  version = "2.3.1"))
If your computer is already configured to use a Kubernetes cluster, you can use the following command to find the apiserver-host and apiserver-port:
7.8 Cloud
When you are working with cloud providers, there are a few connection differences. For instance, connecting from Databricks requires the following connection method:
Since Amazon EMR makes use of YARN, you can connect using master = "yarn":
Connecting to Spark when using IBM’s Watson Studio requires you to retrieve a configuration object through a load_spark_kernels() function that IBM provides:
In Microsoft Azure HDInsights and when using ML Services (R Server), a Spark connection is initialized as follows:
library(RevoScaleR)
cc <- rxSparkConnect(reset = TRUE, interop = "sparklyr")
sc <- rxGetSparklyrConnection(cc)
Connecting from Qubole requires using the qubole connection method:
Refer to your cloud provider’s documentation and support channels if you need help.
7.9 Batches
Most of the time, you use sparklyr interactively; that is, you explicitly connect with spark_connect() and then execute commands to analyze and model large-scale data. However, you can also automate processes by scheduling Spark jobs that use sparklyr. Spark does not provide tools to schedule data-processing tasks; instead, you would use other workflow management tools. This can be useful to transform data, prepare a model and score data overnight, or to make use of Spark by other systems.
As an example, you can create a file named batch.R with the following contents:
library(sparklyr)

sc <- spark_connect(master = "local")

sdf_len(sc, 10) %>% spark_write_csv("batch.csv")

spark_disconnect(sc)
You can then submit this application to Spark in batch mode using spark_submit(), the master parameter should be set to the appropriately.
You can also invoke spark-submit from the shell directly through the following:
/spark-home-path/spark-submit
  --class sparklyr.Shell '/spark-jars-path/sparklyr-2.3-2.11.jar'
  8880 12345 --batch /path/to/batch.R
The last parameters represent the port number 8880 and the session number 12345, which you can set to any unique numeric identifier. You can use the following R code to get the correct paths:
# Retrieve spark-home-path
spark_home_dir()

# Retrieve spark-jars-path
system.file("java", package = "sparklyr")
You can customize your script by passing additional command-line arguments to spark-submit and then read them back in R using commandArgs().
7.10 Tools
When connecting to a Spark cluster using tools like Jupyter and RStudio, you can run the same connection parameters presented in this chapter. However, since many cloud providers make use of a web proxy to secure Spark’s web interface, to use spark_web() or the RStudio Connections pane extension, you need to properly configure the sparklyr.web.spark setting, which you would then pass to spark_config() through the config parameter.
For instance, when using Amazon EMR, you can configure sparklyr.web.spark and sparklyr.web.yarn by dynamically retrieving the YARN application and building the EMR proxy URL:
domain <- "http://ec2-12-345-678-9.us-west-2.compute.amazonaws.com"
config <- spark_config()
config$sparklyr.web.spark <- ~paste0(
  domain, ":20888/proxy/", invoke(spark_context(sc), "applicationId"))
config$sparklyr.web.yarn <- paste0(domain, ":8088")

sc <- spark_connect(master = "yarn", config = config)
7.11 Multiple
It is common to connect once, and only once, to Spark. However, you can also open multiple connections to Spark by connecting to different clusters or by specifying the app_name parameter. This can be helpful to compare Spark versions or validate your analysis before submitting to the cluster. The following example opens connections to Spark 1.6.3, 2.3.0 and Spark Standalone:
# Connect to local Spark 1.6.3
sc_16 <- spark_connect(master = "local", version = "1.6")

# Connect to local Spark 2.3.0
sc_23 <- spark_connect(master = "local", version = "2.3", appName = "Spark23")

# Connect to local Spark Standalone
sc_standalone <- spark_connect(master = "spark://host:port")
Finally, you can disconnect from each connection:
Alternatively, you can disconnect from all connections at once:
7.12 Troubleshooting
Last but not least, we introduce the following troubleshooting techniques: Logging, Spark Submit, and Windows. When in doubt about where to begin, start with the Windows section when using Windows systems, followed by Logging and finally Spark Submit. These techniques are useful when running spark_connect() fails with an error message.
7.12.1 Logging
The first technique to troubleshoot connections is to print Spark logs directly to the console to help you spot additional error messages:
In addition, you can enable verbose logging by setting the sparklyr.verbose option to TRUE when connecting:
7.12.2 Spark Submit
You can diagnose whether a connection issue is specific to R or Spark in general by running an example job through spark-submit and validating that no errors are thrown:
# Find the spark directory using an environment variable
spark_home <- Sys.getenv("SPARK_HOME")

# Or by getting the local spark installation
spark_home <- sparklyr::spark_home_dir()
Then, execute the sample compute Pi example by replacing “local” with the correct master parameter that you are troubleshooting:
# Launching a sample application to compute Pi
system2(
  file.path(spark_home, "bin", "spark-submit"),
  c(
    "--master", "local",
    "--class", "org.apache.spark.examples.SparkPi",
    dir(file.path(spark_home, "examples", "jars"),
        pattern = "spark-examples", full.names = TRUE),
    100),
  stderr = FALSE
)
Pi is roughly 3.1415503141550314If the preceding message is not displayed, you will need to investigate why your Spark cluster is not properly configured, which is beyond the scope of this book. As a start, rerun the Pi example but remove stderr = FALSE; this prints errors to the console, which you then can use to investigate what the problem might be. When using a cloud provider or a Spark distribution, you can contact their support team to help you troubleshoot this further; otherwise, Stack Overflow is a good place to start.
If you do see the message, this means that your Spark cluster is properly configured but somehow R is not able to use Spark, so you need to troubleshoot in detail, as we will explain next.
7.12.2.1 Detailed
To troubleshoot the connection process in detail, you can manually replicate the two-step connection process, which is often very helpful to diagnose connection issues. First, spark-submit is triggered from R, which submits the application to Spark; second, R connects to the running Spark application.
First, identify the Spark installation directory and the path to the correct sparklyr*.jar file by running the following:
Ensure that you identify the correct version that matches your Spark cluster—for instance, sparklyr-2.1-2.11.jar for Spark 2.1.
Then, from the terminal, run this:
18/06/11 12:13:53 INFO sparklyr: Session (42) found port 8880 is available
18/06/11 12:13:53 INFO sparklyr: Gateway (42) is waiting for sparklyr client
                                 to connect to port 8880
The parameter 8880 represents the default port to use in sparklyr, while 42 is the session number, which is a cryptographically secure number generated by sparklyr, but for troubleshooting purposes can be as simple as 42.
If this first connection step fails, it means that the cluster can’t accept the application. This usually means that there are not enough resources, or there are permission restrictions.
The second step is to connect from R as follows (notice that there is a 60-second timeout, so you’ll need to run the R command after running the terminal command; if needed, you can configure this timeout as described in Chapter 9):
If this second connection step fails, it usually means that there is a connectivity problem between R and the driver node. You can try using a different connection port, for instance.
7.12.3 Windows
Connecting from Windows is, in most cases, as straightforward as connecting from Linux and macOS. However, there are a few common connection issues that you should be aware of:
- Firewalls and antivirus software might block ports for your connection. The default port used by
sparklyris8880; double-check that this port is not being blocked. - Long path names can cause issues, especially with older Windows systems like Windows 7. When you’re using these systems, try connecting with Spark installed with all folders, using at most eight characters and no spaces in their names.
7.13 Recap
This chapter presented an overview of Spark’s architecture, connection concepts, and examples to connect in local mode, standalone, YARN, Mesos, Kubernetes, and Livy. It also presented edge nodes and their role while connecting to Spark clusters. This should have provided you with enough information to successfully connect to any Apache Spark cluster.
To troubleshoot connection problems beyond the techniques described in this chapter, we recommend that you search for the connection problem in Stack Overflow, the sparklyr issues GitHub page, and, if needed, open a new GitHub issue in sparklyr to assist further.
In <>, we cover how to use Spark to read and write from a variety of data sources and formats, which allows you to be more agile when adding new data sources for data analysis. What used to take days, weeks, or even months, you now can complete in hours by embracing data lakes.